.avif)
.avif)
.avif)
How to Measure Roman Shades: An Expert Delmarva Guide
- Johann Reardon

- Nov 14, 2025
- 11 min read
TL;DR: To measure for Roman shades, you'll need a steel tape measure. First, decide between an inside mount (for a clean, built-in look) or an outside mount (to make windows look larger or hide trim). For an inside mount, measure the width at the top, middle, and bottom, and use the narrowest measurement. Measure the height on the left, middle, and right, and use the longest measurement. For an outside mount, add 1.5-3 inches to each side for width and 2-3 inches above the frame for height to ensure light control. Always measure to the nearest 1/8th inch and let the manufacturer make all deductions.
Struggling to get the perfect measurements for new Roman shades in your Delmarva home? At Home Blinds & Floors, we help homeowners from Salisbury to Rehoboth Beach avoid common mistakes and achieve a flawless, custom fit for their window treatments. This guide will walk you through the process, but for guaranteed precision, our experts are always ready to help.
Choosing Your Mount: Inside vs. Outside Roman Shades
A perfect fit is what truly elevates Roman shades from a simple window covering to a stunning design feature. The first and most critical decision you'll make is whether to mount your shades inside the window frame or outside of it. This choice affects not only your measurements but also the overall style and functionality of your window treatments.
This quick infographic breaks down the first two things you absolutely have to nail down.
As you can see, it all boils down to having the right tool and making that key choice: inside or outside the frame?
Inside Vs. Outside Mount Explained
An inside mount offers a clean, custom-fit look where the shade sits snugly within the window casing. It's the perfect way to show off beautiful, decorative trim. The only catch? You need enough flat depth inside your window frame to accommodate the shade's headrail.
An outside mount is incredibly versatile. It's the ideal solution if your window frames are too shallow, if you want to hide older or damaged trim, or if you want to create the illusion of a bigger, more dramatic window. Outside mounts are also champs at blocking light, since the fabric overlaps the entire window opening.
Once you know which style you're going with, you're halfway there. For a deeper dive into tools and techniques, you can explore our perfect window measuring template for Delmarva homes.
Inside Mount vs Outside Mount At a Glance
Feeling torn? Use this quick comparison to decide which mounting style best fits your windows and design goals.
Feature | Inside Mount | Outside Mount |
|---|---|---|
Aesthetic | Clean, built-in, and minimalist | Creates a taller, wider look; more dramatic |
Best For | Showcasing attractive window trim | Hiding imperfect frames or shallow windows |
Light Control | Allows small light gaps on the sides | Provides maximum light blockage and privacy |
Depth Required | Needs sufficient flat depth in window frame | No depth requirement; mounts on wall or trim |
Installation | Can be tricky with uneven window frames | More forgiving and easier for DIY installation |
Obstructions | Must clear cranks, locks, and handles | Can easily extend beyond any window obstructions |
Ultimately, the choice comes down to your specific windows and the look you want to achieve. Both can look absolutely fantastic when measured and installed correctly.
As a local, family-run business, Home Blinds & Floors provides personal service, competitive pricing, and professional installation throughout Sussex, Wicomico, Kent, and beyond. We take the guesswork out of measurements to guarantee a perfect fit every time.
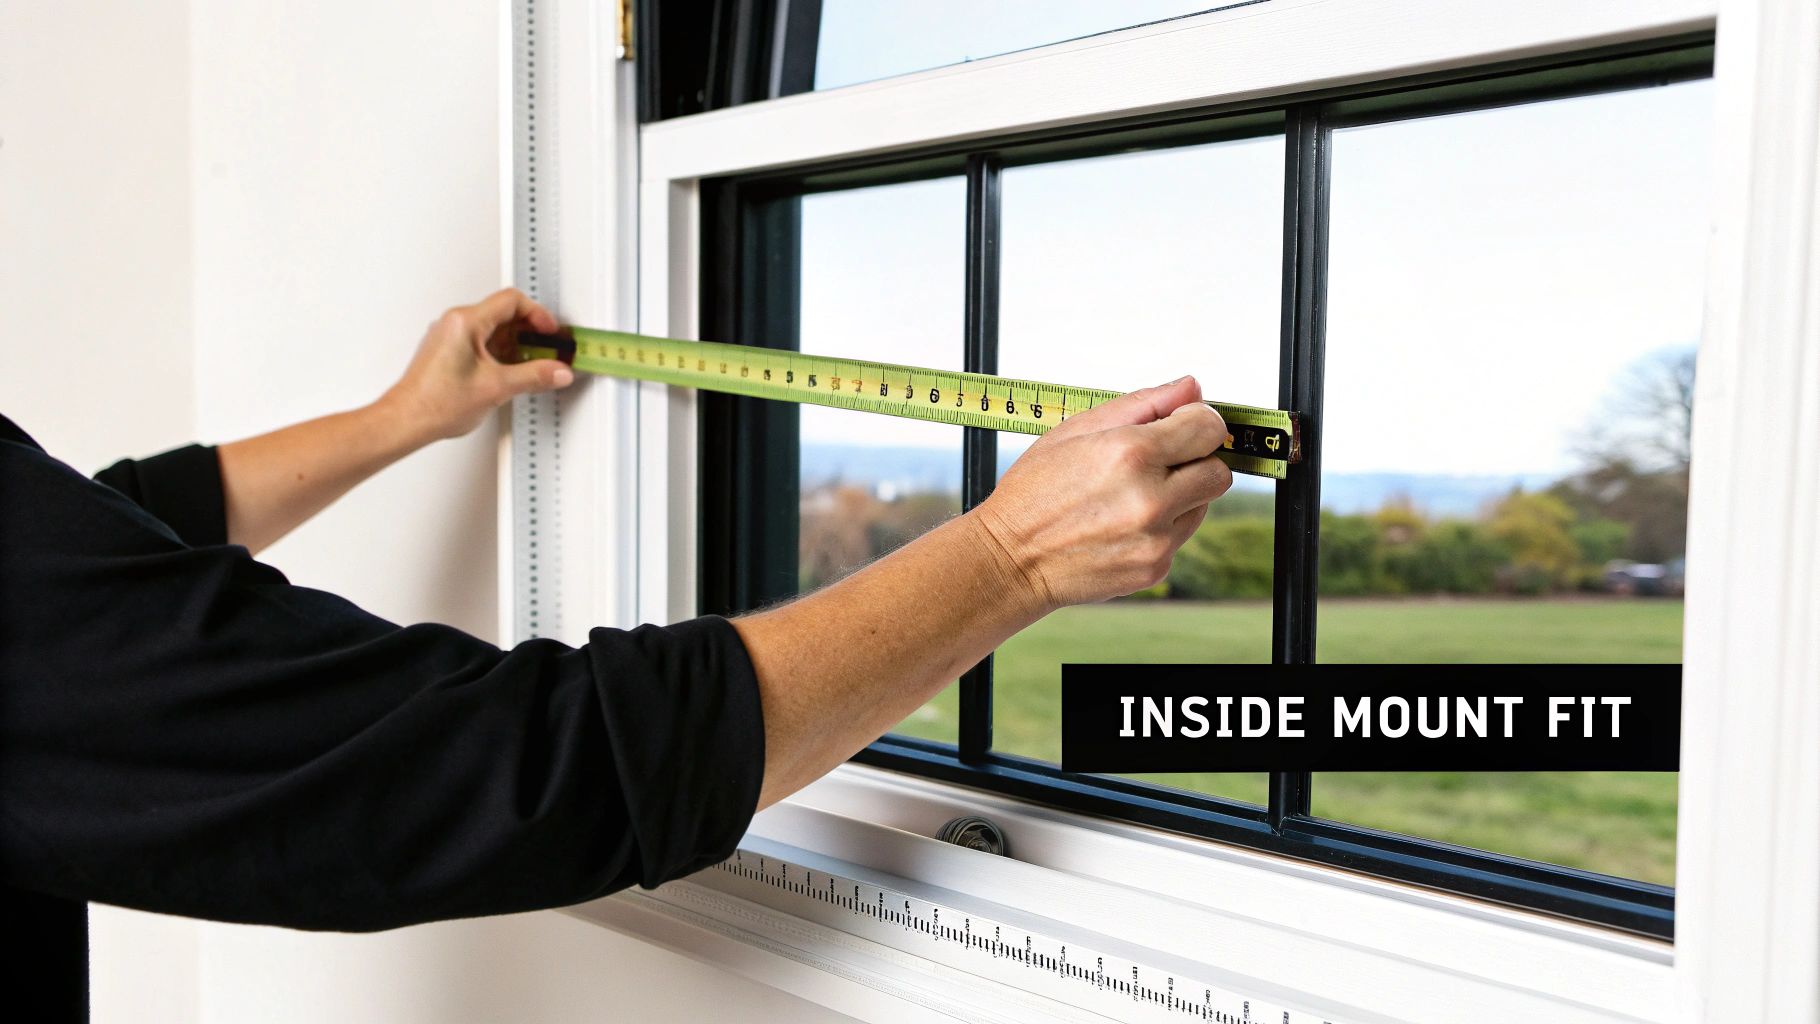
How to Get Precise Inside Mount Measurements
An inside mount gives your Roman shades that clean, built-in look, fitting them neatly right inside the window frame. It’s a polished aesthetic and a popular choice for homeowners in the Delmarva area, but it demands absolute precision. One wrong measurement, and the shade could rub, catch, or not fit at all.
Let's walk through the exact process our professional installers use to guarantee a perfect fit every single time.
Measuring the Width Correctly
Here’s the golden rule for an inside mount: always measure the width in three separate places. Go across the top, middle, and bottom of the window casing. Window frames are almost never perfectly square, and even a tiny variance can cause major headaches down the road.
After you have all three numbers, you must use the narrowest of the three measurements. This is the secret to getting a shade that operates smoothly without catching on the sides. For example, if your measurements are 35", 34 7/8", and 35 1/8", your official width is 34 7/8". Always measure to the nearest 1/8th of an inch.
Home Blinds & Floors offers a wide selection of custom blinds and shades in Delmarva, with expert installers who bring the showroom to your living room. We understand the unique character of Eastern Shore homes and how to account for it.
Verifying Height and Depth
You’ll follow a similar three-point process for the height. Measure from the top of the window frame down to the sill on the left, in the middle, and on the right. For the height, however, you’ll do the opposite of what you did for the width—use the longest measurement of the three. This ensures your shade will fully cover the window opening from top to bottom.
Next, you need to check your window’s depth. This is the flat, usable surface inside the frame where the headrail will be mounted.
Minimum Depth: For a standard installation, you'll typically need at least 1 to 1.5 inches of flat space.
Flush Mount Depth: If you want that completely flush, built-in look where the headrail doesn't stick out at all, you might need 2.5 to 3.5 inches or more.
If your window frame is too shallow, an outside mount will be the better choice. It’s crucial to know these specifics, as many window frames have variances greater than a ½ inch diagonally, which can significantly affect the fit.
How to Measure for Outside Mount Roman Shades
So, when is an outside mount the way to go? It's the perfect solution when an inside mount just isn't an option. Think windows with very shallow frames, or maybe you want to hide some older, not-so-attractive trim. My favorite reason? An outside mount can create the illusion of a much larger, more dramatic window.
With this method, you'll hang the Roman shade on the wall or trim above the window opening. This gives you way more flexibility and, frankly, much better light control.
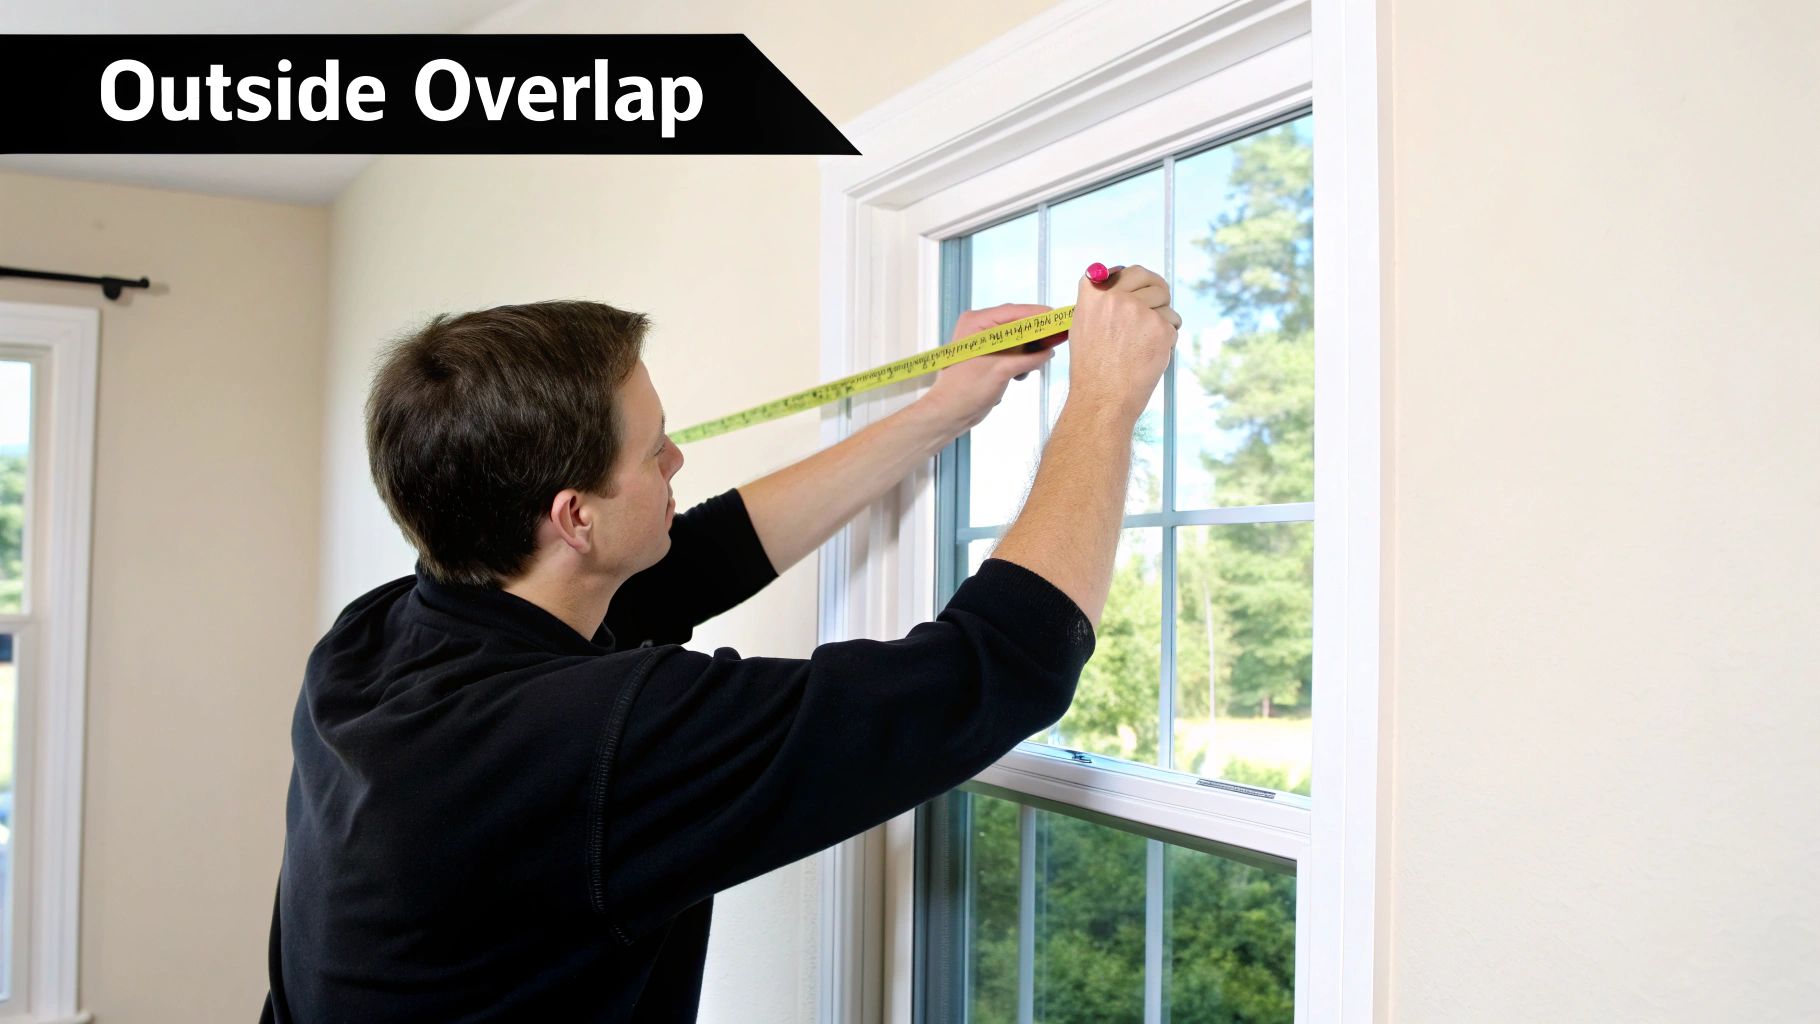
While you don't need the laser-like precision of an inside mount, there are still a few key things to keep in mind to get that polished, professional look. It's all about creating an intentional overlap that looks balanced and works perfectly.
Nailing the Overlap
The secret to a great-looking outside mount is figuring out exactly how much the shade should extend past the window frame. This overlap is what blocks light from seeping in around the edges and gives you total privacy.
Here’s the breakdown:
For the Width: I always recommend adding 1.5 to 3 inches of overlap on each side of the window opening. For example, if your window opening is 35 inches wide, your final shade width should be somewhere between 38 and 41 inches. This little bit of extra fabric is your best defense against those annoying slivers of light.
For the Height: You'll want some overlap at the top and bottom, too. A good starting point is to mount the headrail at least 2 to 3 inches above the top of the window trim. Then, measure from that point down to where you want the shade to stop—usually the bottom of the windowsill or the lower edge of the apron trim.
This extra coverage does more than just control light; it gives the window a more substantial, grander presence in the room.
From free in-home consultations to flawless installation, Home Blinds & Floors takes the stress out of selecting window treatments. We help you navigate these details to find the perfect style for your home.
Watch Out for Obstructions
Before you write down your final numbers, do a quick visual sweep of the area around your window. It’s a simple step that can save you a big headache later.
Look for anything that might get in the way. Are there bulky decorative moldings, a tall piece of furniture pushed against the wall, a thermostat, or a light switch nearby? You need to be sure your final dimensions give the shade enough clearance to move up and down without hitting anything.
For instance, if a bookshelf is right next to the window, you might have the shade end at the windowsill instead of extending below it. A quick check for these details is the best way to avoid any frustrating surprises on installation day.
Avoiding Common Measuring Mistakes
Getting the perfect fit for Roman shades is all about precision. Over the years, I've seen a few common, seemingly small mistakes trip people up, leading to shades that just don't fit right. Let's walk through how to sidestep these pitfalls so your new window treatments look and operate exactly as you imagined.
The most frequent issue I see starts with the tool itself. That soft, cloth sewing tape measure you have in a drawer might seem handy, but it can easily stretch and give you an inaccurate reading. For a job like this, you need to use a rigid steel tape measure. It's the only way to guarantee you're getting the true, precise numbers.
Another easy mistake is rounding your measurements. It’s so tempting to see 34 7/8 inches and just call it 35 inches to keep things simple. Don't do it. That tiny 1/8 inch can be the difference between a shade that glides smoothly and one that scrapes against the window frame every time you use it. Always, always record the exact measurement you see.
Letting the Manufacturer Handle Deductions
This next one is probably the most critical mistake people make when measuring themselves. When you order an inside-mount shade, your job is to provide the exact, "tight" measurement of the window opening. The manufacturer then makes a small, precise deduction—usually somewhere between 1/4 and 1/2 an inch—so the shade has just enough clearance to operate without friction.
The problem starts when you try to subtract this amount yourself. If you do, the factory will subtract it again from the numbers you provide. The result? A shade that's way too narrow, leaving you with frustrating light gaps on the sides.
Pro Tip: Your only job is to provide the exact window opening size, down to the nearest 1/8th of an inch. Let the factory pros handle the deductions—they do it all day long.
Keeping Your Numbers Straight
Consistency is your best friend here. A simple but surprisingly common slip-up is reversing the width and height. Always record your measurements in the same format: Width x Height. Mixing them up is how you end up ordering a shade that's tall and skinny for a window that's short and wide.
Here are a few more potential traps to keep on your radar:
Forgetting Obstructions: Before you finalize anything, scan the window for things like cranks, locks, or alarm sensors that an inside-mount shade might bump into. For outside mounts, make sure the shade won't cover up a light switch or get blocked by bulky trim.
Assuming Windows are Identical: Never measure just one window and order for three, even if they look the same. Homes settle and frames can be slightly different. Measure every single window individually.
Tricky Windows: Bay windows, corner windows, and French doors all have their own unique challenges, from odd angles to deep handle clearance. The measurement techniques for these are a bit more involved, much like the ones we cover in our guide on how to measure shutters.
Accounting for Modern Shade Features
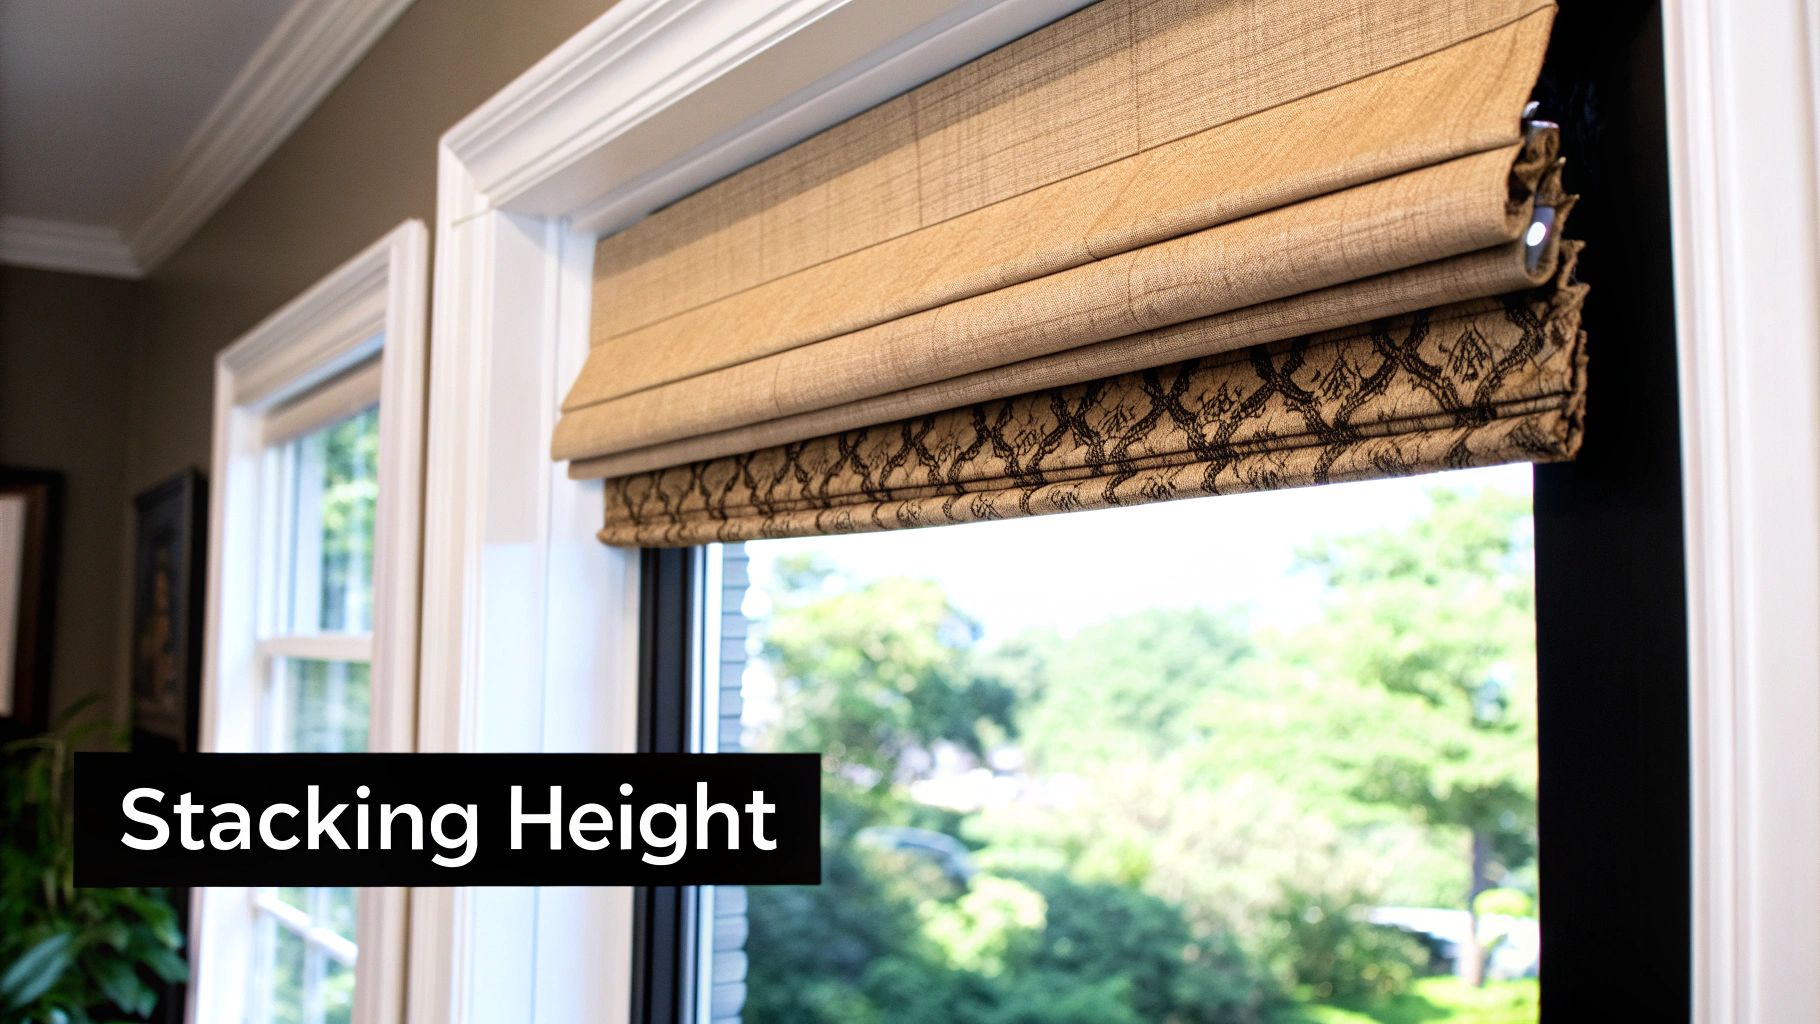
Knowing how to measure for Roman shades isn't what it used to be. Today's shades are packed with features that can throw off your measurements if you aren't careful. It’s a common mistake I see people make—they measure the window perfectly but forget to account for how the shade itself is built.
The biggest factor to watch for is something we call stacking height. This is simply the amount of space the fabric takes up at the top when the shade is fully open. If you’re planning an outside mount, you absolutely have to add this height to your overall measurement. This ensures the "stack" sits neatly on the wall above the window, keeping your beautiful Delmarva view unobstructed.
With an inside mount, the game changes. You need to decide if that stack will block too much of your glass and steal your natural light.
Factoring in Folds and Fabrics
The style of the shade has a huge impact on that stack height. A flat fold Roman shade, with its clean and modern look, creates a very compact stack. On the other hand, a hobbled fold (sometimes called a teardrop) has those classic, cascading loops of fabric that look beautiful but create a much thicker stack.
It all comes back to how these shades have evolved over time. Different styles demand a slightly different approach to measuring. If you're putting several shades side-by-side across a bank of windows, getting those height measurements exactly right is critical for a uniform, polished look.
And don't forget the fabric itself. Heavier materials or shades with an added lining will naturally create a bulkier stack. This is especially true if you’re adding a blackout or thermal layer. It's helpful to understand the role of drapery lining for custom drapes, as that extra material needs to be factored into your calculations.
Accommodating Cordless and Motorized Systems
Cordless and motorized systems are incredibly popular here on the Eastern Shore, both for child safety and for the sheer convenience of home automation. But these upgrades come with their own set of measurement rules.
Larger Headrails: Both cordless and motorized shades need bigger, bulkier headrails to hide all the internal workings. This means you’ll need more mounting depth for an inside mount. I’ve seen some that require 3 inches or more to sit completely flush inside the window frame.
Clearance is Key: For an outside mount, you have to be sure that larger headrail won't bump into your window trim, crown molding, or any other architectural features.
These modern systems are fantastic, but they make getting precise measurements more crucial than ever. For a deeper dive, check out our guide on whether motorized blinds are worth it for your home. When the measurements are spot-on, these systems work like a dream and look perfectly integrated.
FAQ: Measuring Roman Shades in Your Delmarva Home
Even the clearest instructions can leave you with a few lingering questions. When you're measuring for custom Roman shades, getting those little details right is what separates a good fit from a perfect one. Let's walk through some of the most common questions we get from homeowners here on the Delmarva Peninsula.
What are the essential tools for measuring Roman shades?
First things first, grab a steel tape measure. This is your most important tool. Unlike a cloth or plastic measuring tape, a steel one won’t sag or stretch, which means your numbers will be dead-on accurate. You’ll also want a pencil and paper handy to jot everything down. Always write your measurements down as Width x Height and double-check your numbers to avoid costly mistakes.
How much window depth is needed for an inside mount Roman shade?
This really comes down to the headrail system of the specific shade you choose. For a standard Roman shade, you can usually get by with a flat mounting surface of about 1 to 1.5 inches inside the window frame. However, for a fully recessed, flush fit—especially with motorized options—you may need 2.5 to 3.5 inches of depth or more. If your window frame is too shallow, an outside mount is a fantastic and stylish solution.
Should I make any deductions from my inside mount measurements?
Absolutely not. Your only job is to provide the precise, tight measurement of the window opening, recorded to the nearest 1/8th of an inch. The manufacturer will take care of making the necessary deductions (usually between 1/4 and 1/2 inch) to ensure the shade hangs and operates perfectly. If you subtract from the measurements yourself, the final product will be too narrow and create unsightly light gaps.
What cities in Delmarva do you serve?
Home Blinds & Floors proudly serves homeowners and businesses across the Delmarva Peninsula. Our service areas include Salisbury, Ocean City, and Berlin in Maryland, as well as Rehoboth Beach, Lewes, Bethany Beach, and all of Sussex and Kent counties in Delaware. We bring the showroom to you with our free in-home consultations.
Get a Perfect Fit with Home Blinds & Floors
In summary, getting the measurements just right is the single most important step for beautiful, perfectly functioning Roman shades. It's the difference between a custom, high-end look and something that just feels a bit off. While you can follow this guide and our DIY guide to installing Roman shades, sometimes the surest way to a flawless finish is to bring in a professional.
Home Blinds & Floors provides custom window treatments, expert advice, and in-home service to homes across the Delmarva Peninsula. From Rehoboth Beach to Easton, our team is here to help you choose the best shades, shutters, or blinds for your space. We handle all the tricky details so you don't have to, ensuring a perfect fit every time.
Schedule your free in-home consultation today, and let’s make sure your new window treatments look absolutely stunning.


Comments