.avif)
.avif)
.avif)
How to Install Vertical Blinds in Delmarva: An Expert Guide
- Johann Reardon

- Aug 24, 2025
- 7 min read
TL;DR: Installing vertical blinds is a manageable DIY project. The key is precise measurement, choosing between an inside or outside mount, and ensuring the mounting brackets are perfectly level. You'll need a steel tape measure, a drill, and a level. For a guaranteed perfect fit, especially on large sliding doors or tricky windows, a professional installation from a local expert like Home Blinds & Floors ensures a flawless result.
Are you looking for a stylish and practical way to cover a sliding glass door or a large window in your Delmarva home? At Home Blinds & Floors, we help homeowners from Salisbury to Rehoboth Beach find the perfect balance of light control and privacy with custom vertical blinds. While the idea of installation might seem tricky, this guide will walk you through the process for a professional-looking finish.
Preparing for Your Vertical Blind Installation
The secret to a successful vertical blind installation is all in the details. A little preparation goes a long way, ensuring your new blinds fit perfectly and operate smoothly for years to come. Think of this as your pre-flight checklist before you even open the box.
Mounting Decision: First, decide where the blinds will go. An inside mount gives you that clean, built-in look, fitting neatly within the window frame. An outside mount, on the other hand, is installed on the wall above the window and can make your windows feel larger and more dramatic.
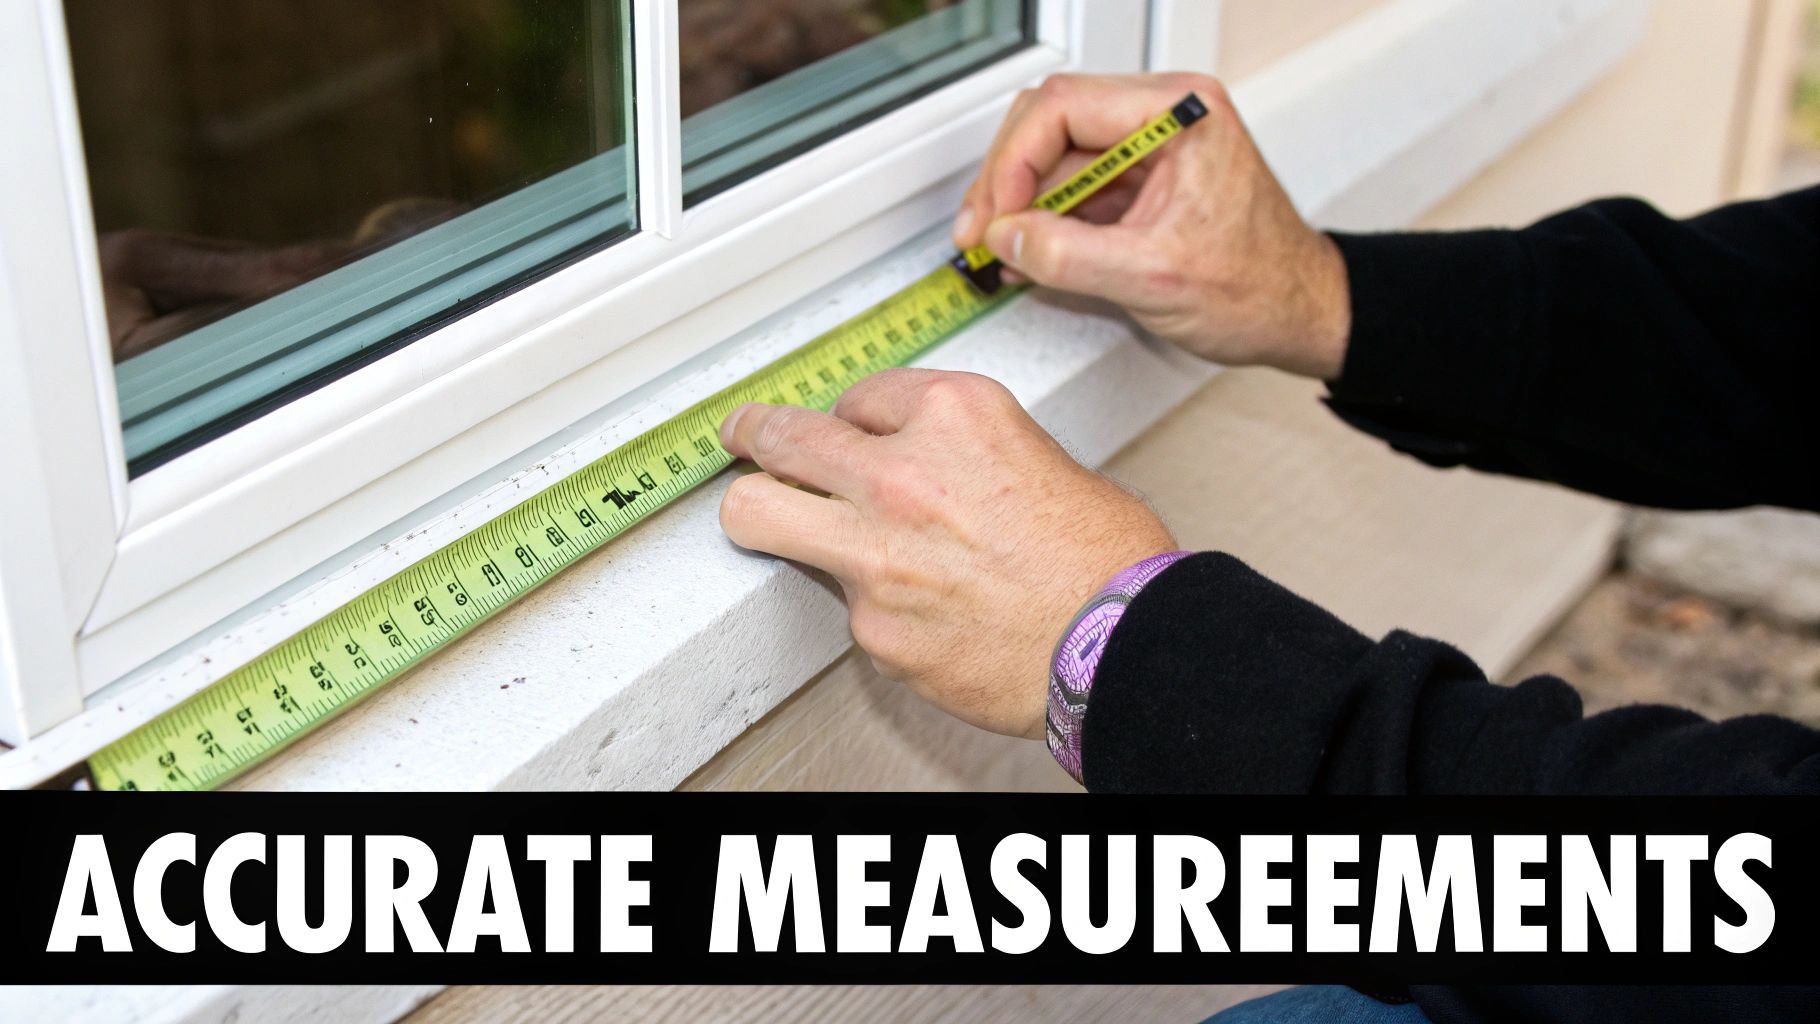
Accurate Measurements: This is where you can't afford a mistake. Grab a steel tape measure for the best accuracy. Our advice? Measure twice, order once. Double-checking your numbers now saves a massive headache later.
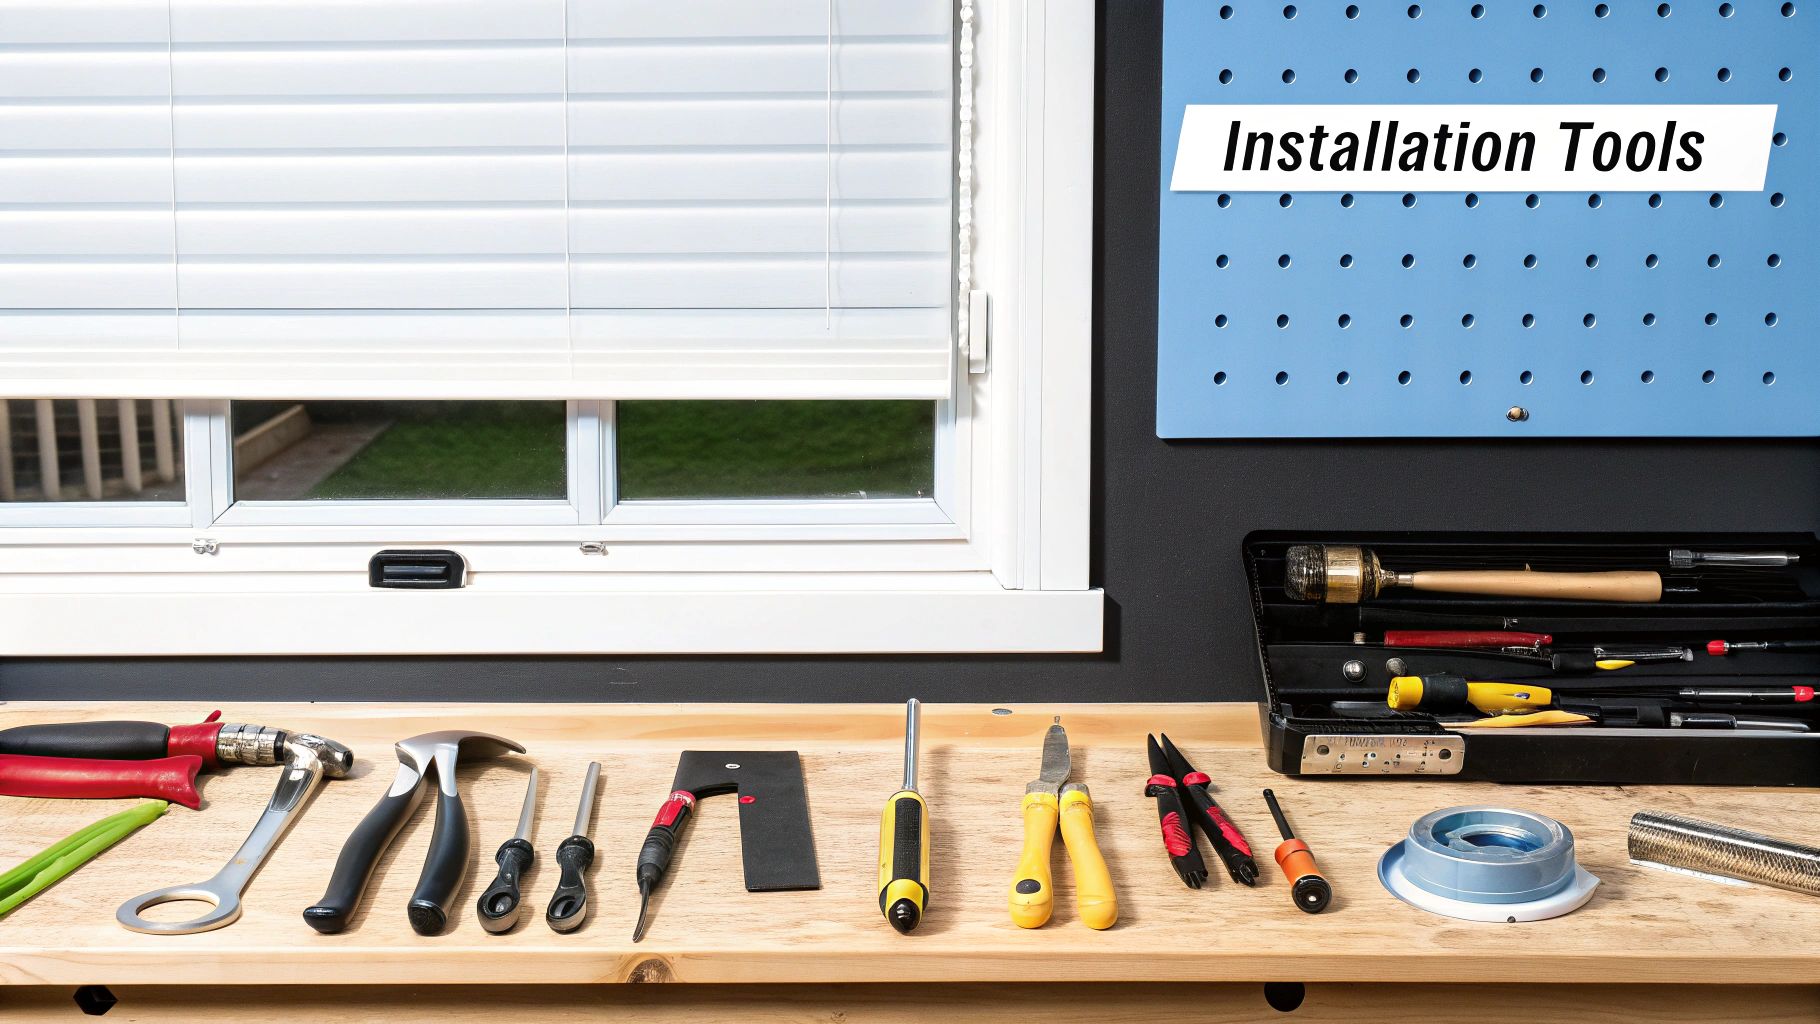
Essential Tools: Get your toolkit ready. You'll absolutely need a drill, a level (your phone's level app will do in a pinch, but a real one is better), a pencil for marking, and a screwdriver.
Secure Brackets: When it’s time to install, your mounting brackets are the foundation. They must be level and securely fastened to the wall or window frame. If they're wobbly, your blinds will never hang right.
Vane Alignment: As you hang the individual vanes, pay close attention to which way they're facing. You want them all oriented in the same direction for that polished, uniform appearance.
From free in-home consultations to flawless installation, Home Blinds & Floors takes the stress out of selecting window treatments for your home on the Eastern Shore.
Vertical Blinds Installation at a Glance
Phase | Key Action | Essential Tool |
|---|---|---|
Preparation | Decide on inside or outside mount and take precise measurements. | Steel Tape Measure |
Bracket Installation | Mark and securely attach mounting brackets, ensuring they are level. | Drill & Level |
Headrail Mounting | Snap or slide the headrail securely into the installed brackets. | Screwdriver |
Vane & Valance Hanging | Attach each vane to its hook and install the decorative valance. | None |
This table maps out the core stages, but remember that the real work is in the precision. While taking the DIY route can be satisfying, a professional installation guarantees perfection.
Choosing the Right Vertical Blinds for Your Delmarva Home
Vertical blinds are a classic for a reason—they're stylish, practical, and offer fantastic light control for large windows and sliding glass doors. But before you start drilling, let's cover the essentials to ensure a flawless result.
Like any home project, a little planning upfront saves a lot of headaches. If you’re in the middle of a bigger project, using an ultimate home renovation checklist can help keep everything straight. For this job, your journey begins with two key decisions.
Mounting Style: Are you going for an inside mount for that sleek, contained look inside the window frame? Or an outside mount, which can make your window feel bigger and hide imperfect trim?
Tool Collection: Let's get the essentials together. You’ll definitely need a good drill, a steel tape measure (not a flimsy fabric one!), a pencil for marking, and—this is non-negotiable—a level.
As a local, family-run business, Home Blinds & Floors provides personal service, competitive pricing, and professional installation throughout Sussex, Wicomico, Kent, and beyond. We bring this same obsessive attention to detail to every consultation, from Salisbury to Easton.
Getting the prep work right is more than half the battle. A few extra minutes spent planning and organizing your tools can save hours of correction and adjustment later on.
For an even more in-depth look, our team has put together a detailed guide on how to measure for blinds with more tips from the field.
Choosing Your Mounting Style
An inside mount sits neatly inside the window frame, giving you a clean, built-in look. For this to work, you need enough depth in your window frame—we usually recommend at least 2.5 to 3 inches. This gives the headrail enough space and ensures the vanes can turn without hitting the glass.
If your window frame is too shallow, an outside mount is the way to go. This is when you install the blinds on the wall or trim above the window. It’s a great trick for making windows appear larger and it’s also a lifesaver for hiding imperfect window trim, which we see a lot in older Coastal Delmarva homes.
Before you decide, check for obstructions like window cranks, handles, or security sensors. Thinking about these little details now prevents a lot of frustration later.
Pro Tip: When measuring for an inside mount, always take three measurements for the width (top, middle, and bottom) and three for the height (left, middle, and right). Use the smallest width and the longest height. This trick accounts for windows that aren't perfectly square, ensuring a perfect fit.
A Step-by-Step Guide to Installation
With your measurements double-checked and tools laid out, it's time for the installation. Getting the mounting brackets and headrail installed just right is the bedrock of a good vertical blind installation. It's what makes the difference between blinds that glide effortlessly and ones that are a constant headache.
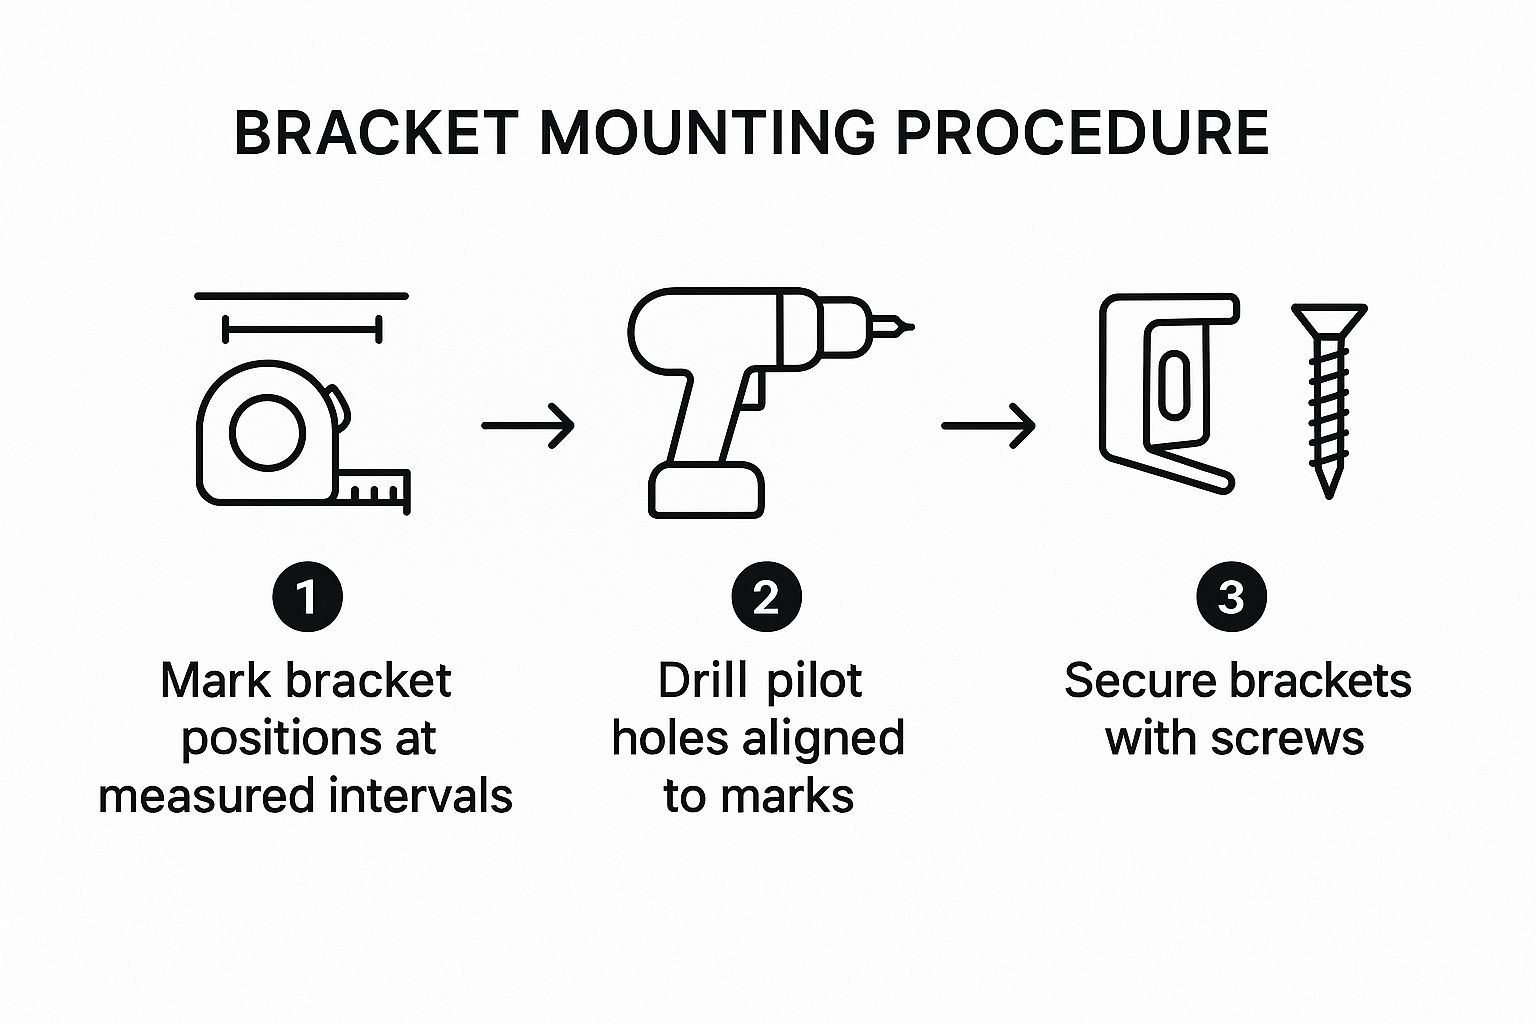
Marking and Drilling for Your Brackets
First, let's figure out where the brackets will live. Use your pencil and level to mark the screw hole locations. A good rule of thumb is to place the two end brackets about 2-3 inches in from each end of the headrail. If your window is over 60 inches wide, place a center support bracket in the exact middle to prevent the headrail from sagging.
With your spots marked, it's time to drill pilot holes.
Drywall or Plaster: Drill a pilot hole, then gently tap in a wall anchor until it's flush. That anchor gives the screw something solid to bite into.
Wood Trim or Studs: You can skip the anchors. Just drill a pilot hole that's slightly smaller than the screw's diameter to keep the wood from splitting.
Now attach the brackets loosely with the provided screws.
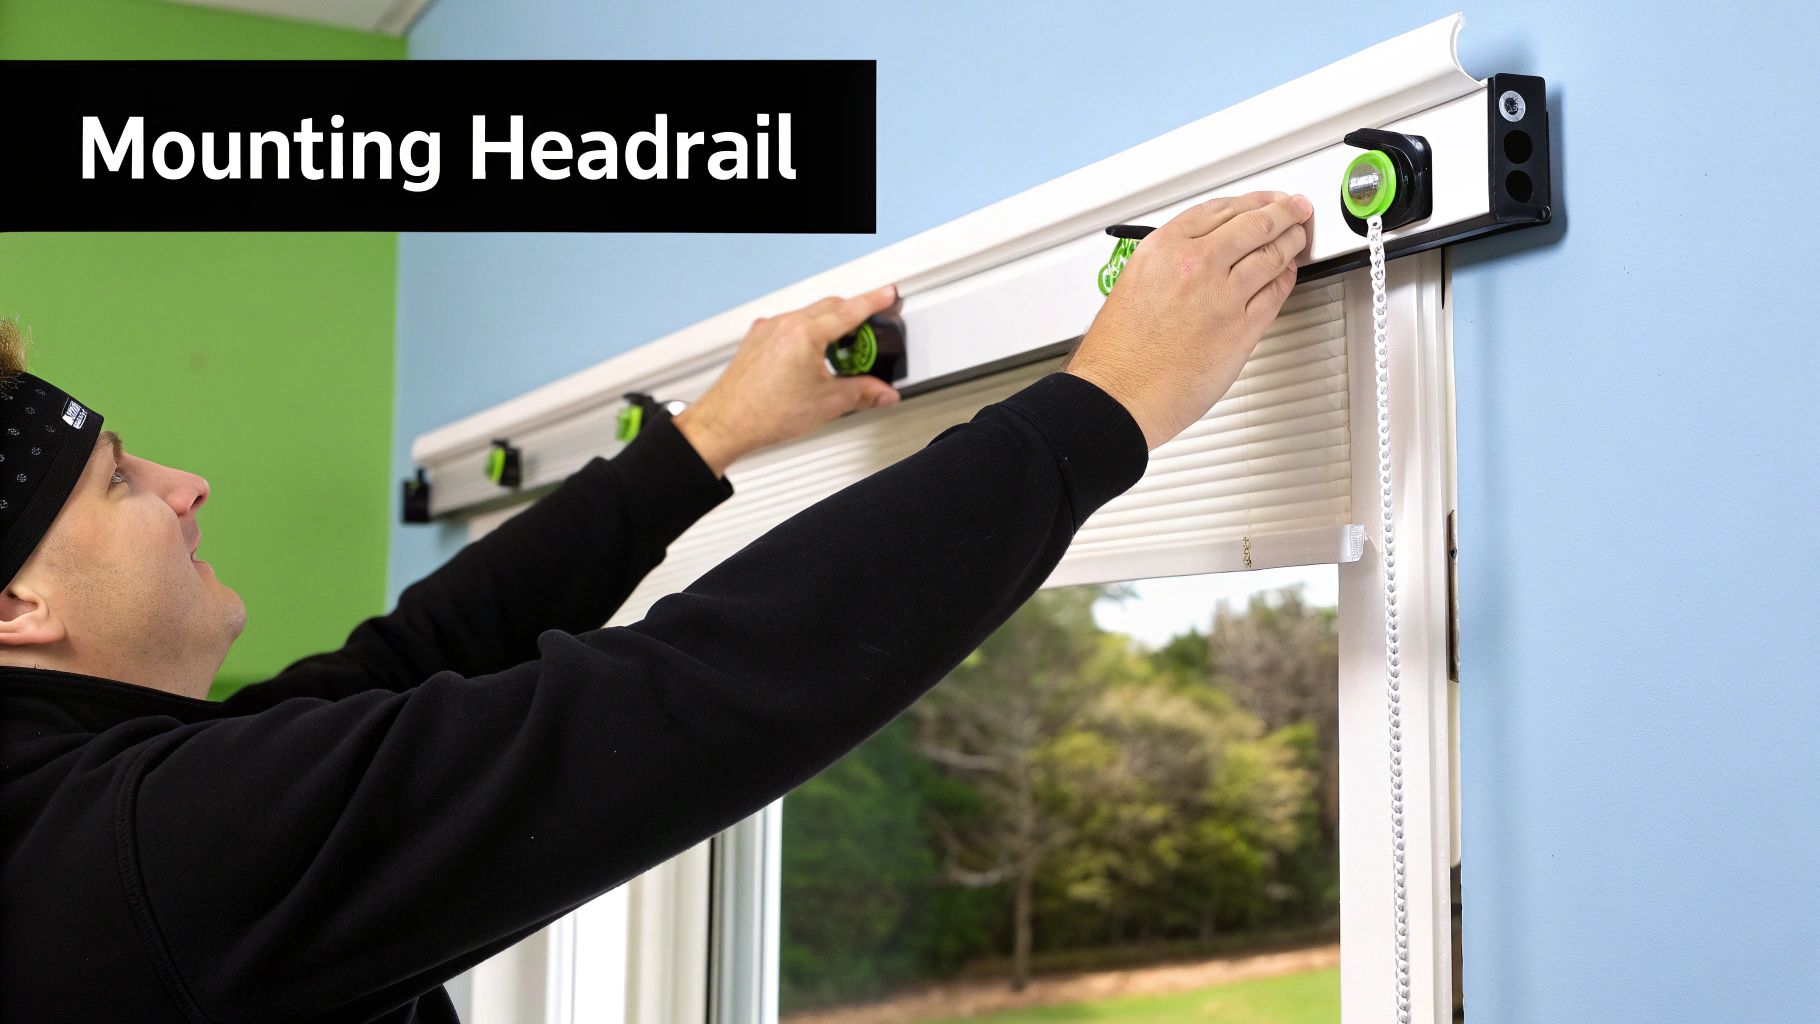
Securing the Headrail Like a Pro
With your brackets up, grab your level one more time and lay it across them. This is your last chance to make sure they are perfectly aligned. An unlevel headrail is the number one reason vertical blinds get jammed or hang unevenly. Once you're sure they're level, tighten all the screws until the brackets are secure.
Now, pop the headrail in. Most headrails are designed to snap into the brackets. Hook the front edge of the headrail into the bracket first, then push up firmly on the back until you hear and feel a solid "click."
The Most Important Final Check: Step back and eyeball the headrail. Does it look perfectly parallel to the window frame? Give it a gentle pull to make sure it's secure. This final check is your best insurance against problems and a step no professional would ever skip.
These principles apply to more than just vertical blinds. If you're exploring other options, our walkthrough on how to install plantation blinds in this complete DIY guide shares more tips for a professional finish.
Hanging the Vanes and Making Final Adjustments
With the headrail secure, you’re on the home stretch. Start at one end and work your way across. Take a vane and gently push its top edge up into its clear plastic clip until you hear a soft "click." Make sure every single vane faces the same direction for a clean, uniform look.
Once all the vanes are hanging, it's time to deal with the controls.
Wand Control: If your blinds have a wand, it usually just hooks into an eyelet on the lead carrier.
Cord and Chain: Attach the tension device to the wall or window frame. This is a critical safety feature that keeps the cords taut and out of harm's way.
Home Blinds & Floors offers a wide selection of custom blinds and shades in Delmarva, with expert installers who bring the showroom to your living room. We handle these final details flawlessly every time.
Now, give your new blinds a test run. Rotate the vanes and draw them open and closed. They should glide smoothly. If a vane doesn't rotate, its carrier stem may be misaligned; gently turn it with your fingers until it clicks back into place. For more advice, check out our expert tips for every room.
Frequently Asked Questions About Vertical Blinds
Even with a detailed guide, a few questions always pop up. Here are the most common ones we hear from homeowners across the Delmarva Peninsula.
What's the difference between an inside and outside mount?
An inside mount fits snugly within the window casing for a clean, built-in look. An outside mount is installed on the wall or trim above and around the window, which can make the window appear larger and is more forgiving with measurements.
Can I install vertical blinds myself?
Absolutely. For most homeowners comfortable with a drill and tape measure, a DIY installation is very doable. However, for oversized windows, complex sliding doors, or if you simply want a guaranteed perfect result, calling a professional from Home Blinds & Floors can save time and prevent costly mistakes. We have experience with all types of windows, including tricky ones discussed in our guide to the best window treatments for bay windows.
How do I keep my vertical blinds clean?
It's simple! For vinyl or aluminum vanes, a damp cloth is all you need to wipe away dust. For fabric vanes, use the brush attachment on your vacuum. Regular, light cleaning prevents grime buildup and keeps them looking new.
What areas of Delmarva do you serve?
Home Blinds & Floors proudly serves the entire Delmarva Peninsula. Our mobile showroom brings custom blinds, shades, and shutters directly to your home, whether you're in Delaware or on the Eastern Shore of Maryland. We frequently serve homeowners and businesses in Salisbury, Ocean City, Easton, Rehoboth Beach, Lewes, and Dover.
Your Local Vertical Blinds Experts in Delmarva
In summary, Home Blinds & Floors provides custom window treatments, expert advice, and in-home service to homes across the Delmarva Peninsula. While a DIY installation is rewarding, nothing beats the precision and peace of mind that comes with a professional touch. For various home improvement tasks, checking out general home services offered by trusted local pros is a smart step. From Rehoboth Beach to Easton, our team is here to help you choose the best shades, shutters, or blinds for your space. Schedule your free, no-obligation in-home consultation today!


Comments