.avif)
.avif)
.avif)
How to Install Plantation Blinds: Complete DIY Guide
- Johann Reardon
- Jul 18, 2025
- 15 min read
Getting Started Without The Guesswork
Installing plantation blinds yourself might seem like a big task, but with a little planning, it's a DIY project you can definitely handle. It's a bit like cooking – having all your ingredients and utensils ready makes the whole process much smoother. This section will walk you through those essential first steps, helping you avoid common mistakes that can lead to frustration and wasted time.
Essential Preparation
Good preparation is the key to a successful installation. Just as a builder carefully prepares a site before starting construction, you should do the same for your blinds. This means gathering the necessary tools, getting precise measurements, and understanding the process. For a deeper dive into measuring, check out this helpful guide: How to master measuring for blinds.
Gather Your Tools: Keeping everything close at hand will save you time and prevent interruptions. Gather essential tools such as a measuring tape, drill, screwdriver, level, pencil, and safety glasses.
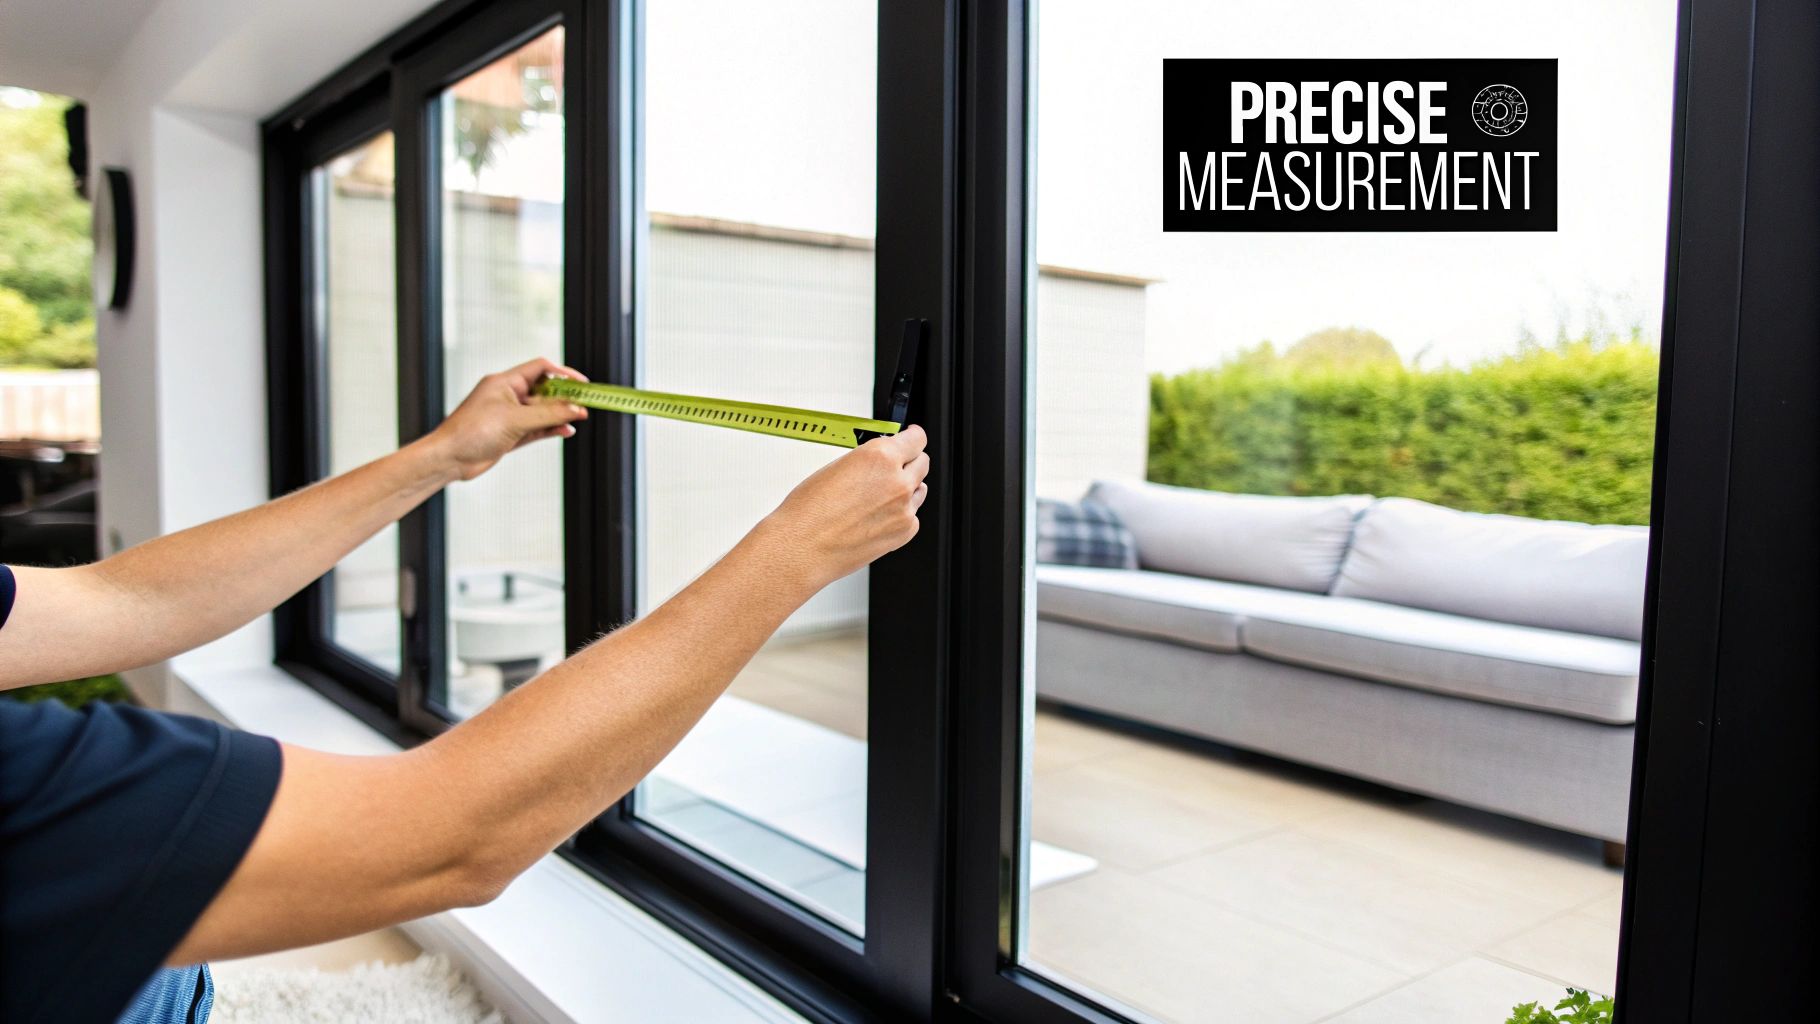
Accurate Measurements: Precise measurements are crucial for a perfect fit. Measure your windows diligently, taking note of the width and height at several points. This accounts for any slight variations in the window frame. Double-checking your measurements will ensure your blinds fit snugly.
Understand the Process: Take some time to review the installation instructions that come with your specific brand of plantation blinds. Knowing the steps ahead of time will build your confidence and help you anticipate any potential hiccups along the way.
The Three-Step Installation Overview
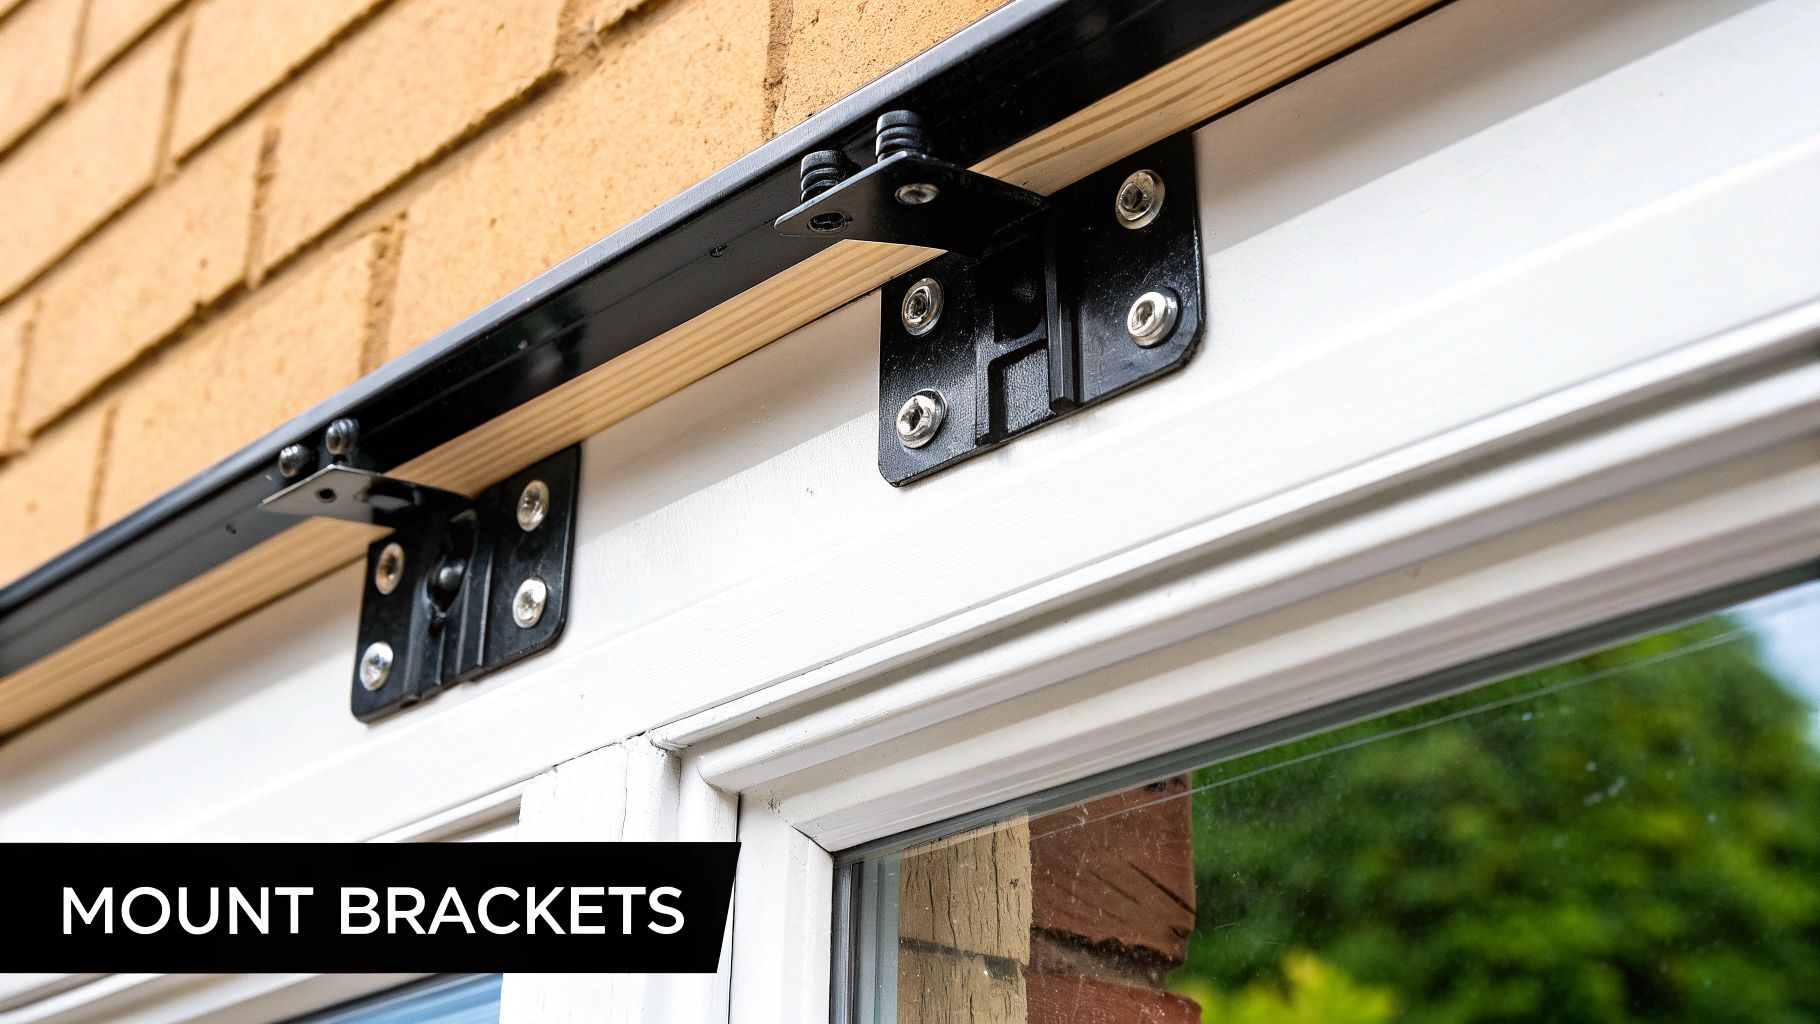
The infographic below provides a visual overview of the installation process, breaking it down into three key steps: accurately measuring your windows, securely installing the brackets, and finally, mounting the blinds themselves.

This simple process emphasizes the importance of each step. Accurate measurements form the basis for secure bracket placement, which, in turn, guarantees the blinds fit properly and function smoothly. Each step builds upon the previous one, creating a seamless installation.
Choosing Your Mounting Option: Inside vs. Outside
Before you even think about grabbing your drill, you need to decide between an inside mount (blinds fit within the window frame) and an outside mount (blinds mounted outside the frame). This decision affects both the look and function of your blinds. Inside mounts offer a clean, built-in appearance, while outside mounts offer superior light blockage and are suitable for windows with shallow depths. Consider your window type, the aesthetic you're aiming for, and your practical needs to make the right choice. This decision lays the groundwork for the rest of the installation.
To help you gather the necessary tools and materials, here's a handy checklist:
Essential Tools and Materials Checklist
Tool/Material | Purpose | Professional Grade | Budget Alternative |
|---|---|---|---|
Measuring Tape | Accurate window measurements | Self-retracting metal tape measure | Standard retractable tape measure |
Drill | Creating pilot holes for screws | Cordless drill with various bits | Corded drill with basic bits |
Screwdriver | Securing screws and brackets | Power screwdriver with multiple bits | Manual screwdriver set |
Level | Ensuring level installation | Laser level | Standard bubble level |
Pencil | Marking measurements and screw locations | Carpenter's pencil | Any standard pencil |
Safety Glasses | Protecting eyes from debris | Impact-resistant safety glasses | Basic safety glasses |
Plantation Blinds | The window covering itself | Custom-made blinds | Standard-sized blinds |
Mounting Brackets | Attaching blinds to the window frame | Heavy-duty brackets | Standard mounting brackets |
Screws | Securing brackets to the frame | High-quality wood screws | Standard screws |
This checklist outlines the essential tools and materials needed for your plantation blind installation project. While professional-grade tools often offer enhanced durability and features, budget-friendly options can be perfectly adequate for most DIY installations. Choose the tools that best fit your budget and project needs.
DIY vs. Professional: Making The Smart Choice
So, you're ready to install new plantation blinds. Now for the big decision: Do It Yourself or hire a professional? This goes beyond just your budget. It's about honestly assessing your skills, how complex your windows are, and the long-term value. Let's explore the factors to help you make the right choice.
Assessing Your DIY Readiness
Think about assembling furniture. Some enjoy the process; others find it frustrating. Installing plantation blinds falls somewhere in between. If you're comfortable using tools like drills and levels, and enjoy hands-on projects, DIY might be a good fit. If complex instructions make you nervous, or you're unsure about tricky window shapes, professional installation might be better. You might be interested in: How to master choosing window treatments.
Window Complexity: A Key Factor
Standard rectangular windows are usually easier for DIY installation. Arched, bay, or unusually angled windows can be challenging. Professionals have the experience and tools to handle these, ensuring a perfect fit and smooth operation. Also, consider window size. Large, heavy blinds can be tough to maneuver and install alone, making professional help valuable.
Time vs. Money: The Real Trade-Off
DIY saves money on installation fees, but takes time. Factor in measuring, prepping, and installing, which can take several hours per window, especially for beginners. Professionals can often work much faster. DIY might be better if you have free time and enjoy working methodically. If your time is limited, hiring a professional might be worthwhile. When budgeting, remember all costs. A helpful resource: home loan document checklist.
Warranty Implications
Many manufacturers offer warranties, but these often have specific installation requirements. DIY might void the warranty if something goes wrong. Professional installation often comes with its own guarantee, protecting your investment. Understanding warranty implications can heavily influence your decision.
Learning From Others' Experiences
The installation process is key to market adoption. Surveys suggest over 60% of window treatment installations are done by professionals, especially for premium products like plantation shutters. Around 20-25% of buyers choose DIY, driven by potential cost savings. Learn more about plantation shutters market trends.
Consider others' experiences. Some find DIY satisfying for simple installations but regret it for complex windows. Others appreciate professional speed and expertise, even at a higher cost. Some found DIY offered better control over minor adjustments, resulting in a more personalized fit. The "best" choice depends on your circumstances.
Making the Final Decision
Ultimately, the choice depends on your needs and priorities. Weigh the complexity of your windows, your DIY skills, your budget, and your time. By considering these factors, you can confidently choose the best approach for a successful installation.
Mastering Inside Mount Installation
Inside mount installation is a popular choice for plantation blinds, offering a clean and integrated look. Achieving this seamless appearance, however, requires careful planning and precise measurements. This guide will walk you through the process, providing tips and insights to help you achieve a professional-looking installation.
Initial Assessment: Is Inside Mount Right for You?
Before you begin measuring, it's crucial to determine if your windows are suitable for inside mounting. Plantation blinds require adequate depth within the window frame. A general rule of thumb is to have at least 2 inches of depth. If your window frame is shallower than this, an outside mount may be a better option. Also, check to ensure your window frame is relatively square and free from obstructions.
Measuring With Precision
Accurate measurements are the cornerstone of a successful inside mount installation. Measure the width of your window frame at the top, middle, and bottom. Record the smallest of these three measurements. This accounts for any slight variations or inconsistencies in the frame. Follow the same process for the height, measuring the left, middle, and right sides and recording the shortest measurement. These precise measurements will ensure a perfect fit. Just like academics meticulously organizing their research, accurate measurements lead to better results. Studies have shown that organized academics spend 40% less time reviewing existing research and cite 35% more sources. Learn more about research efficiency.
Marking and Drilling Pilot Holes
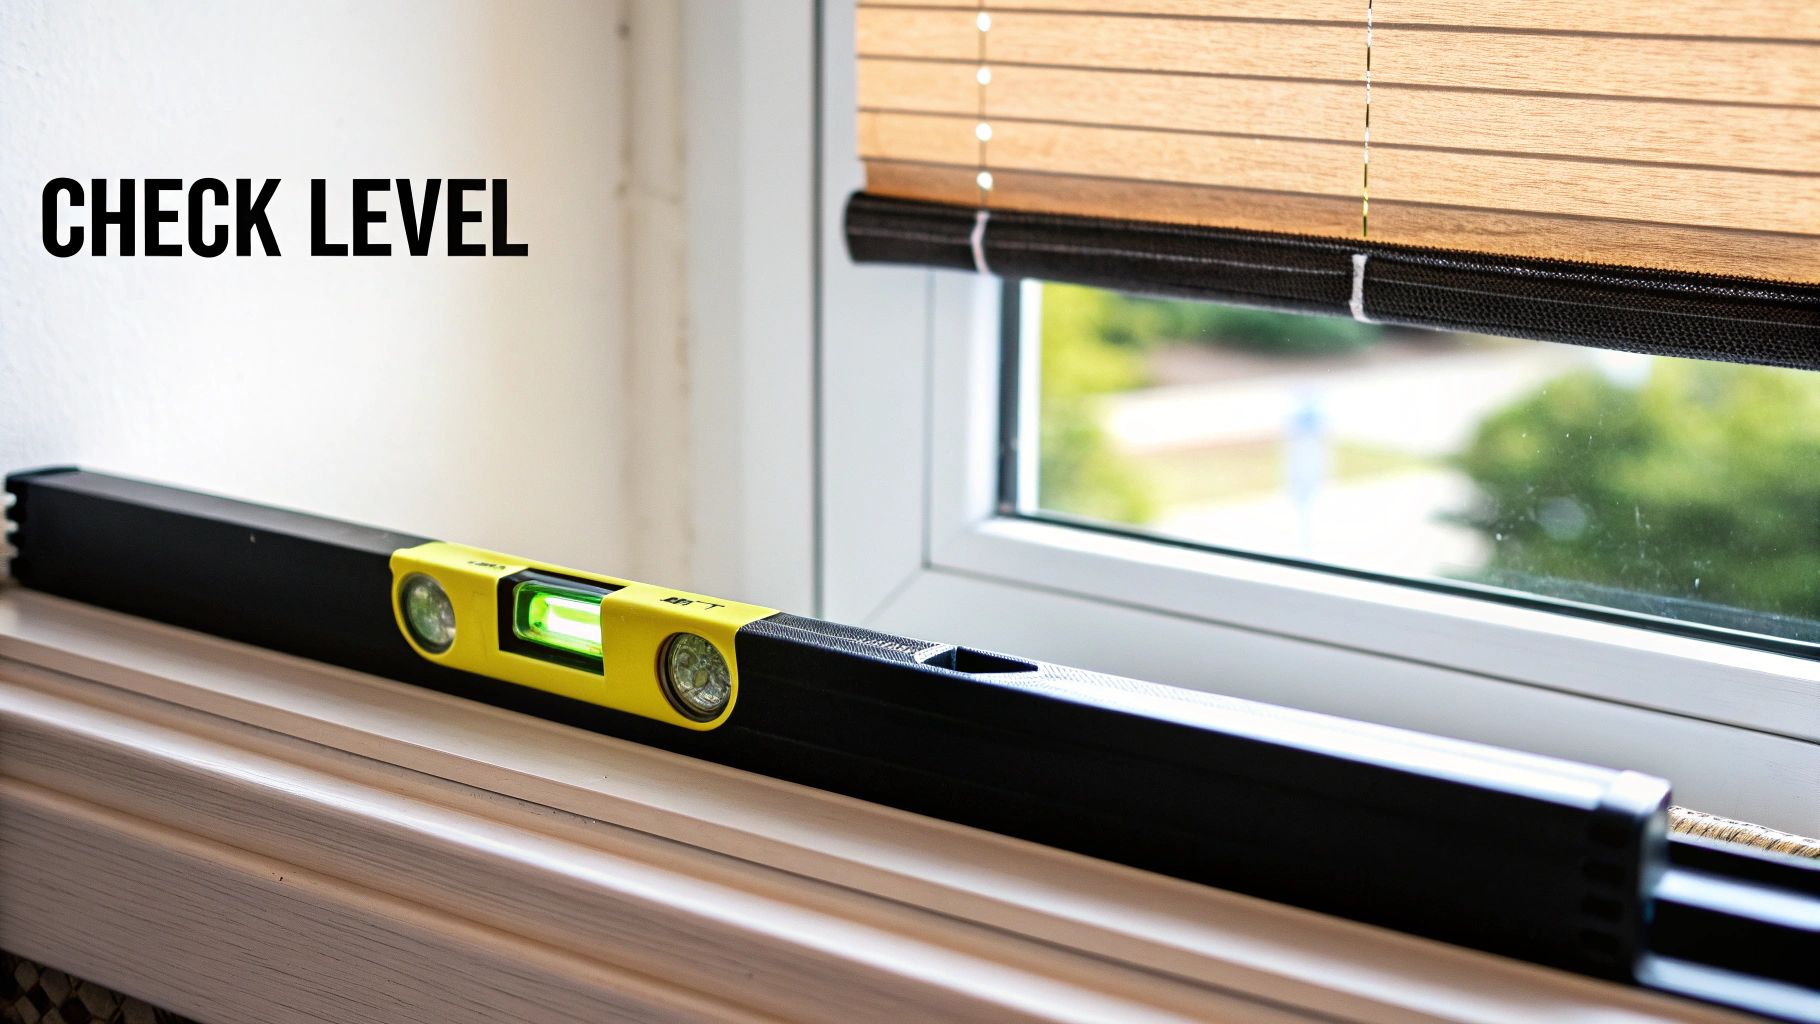
With your measurements in hand, carefully mark the locations for your mounting brackets. A level is essential to ensure perfect alignment. Double-check your measurements and bracket placement before drilling. Drilling pilot holes is a crucial step to prevent the wood from splitting when the screws are inserted. This attention to detail is comparable to a surgeon planning an incision—accuracy is paramount.
Installing the Mounting Brackets
Attach the mounting brackets using appropriate screws, ensuring they are firmly secured to the window frame. After the brackets are installed, open the bracket covers in preparation for mounting the blinds.
Mounting the Blinds
Carefully slide the headrail of the plantation blinds into the open brackets. Push it back until you hear a click, indicating it's securely in place. Close the bracket covers to conceal the mounting hardware for a polished finish.
Final Adjustments and Testing
After mounting the blinds, test their functionality. Raise and lower the blinds, and adjust the louvers to ensure smooth operation. This final check allows you to catch and address any issues before completing the installation. For instance, slightly uneven movement could suggest a minor adjustment to one of the brackets.
Troubleshooting Common Issues
Even with meticulous preparation, challenges can arise. Uneven surfaces or variations in window trim can occasionally affect the fit. For uneven surfaces, shims can be used to create a level mounting surface for the brackets, ensuring the blinds hang straight. Also, consider how your window trim interacts with the blinds to ensure there's no interference when opening or closing them.
This step-by-step guide empowers you to confidently install your plantation blinds, ensuring they not only operate smoothly but also elevate the overall aesthetics of your room.
Outside Mount Techniques That Actually Work
Outside mounting offers distinct advantages for plantation blinds, providing superior light control and privacy. This is particularly helpful for windows with limited inside depth or unusual shapes. This section will guide you through effective outside mounting techniques, ensuring a polished look that complements your home.
Precise Measuring for Outside Mounts
Accurate measurements are essential for outside mounts. You'll need to calculate the blind overlap, the extra width and height added to your window's dimensions to guarantee full light blockage and privacy. This typically adds 2 to 4 inches on each side and top, but can be adjusted based on your needs and the specific window. For instance, a 36-inch wide window might require a 44-inch wide blind with a 4-inch overlap on each side. Learn more in this article about the surprising light-blocking benefits of plantation shutters. This ensures your blinds effectively cover the entire window.
Positioning for Optimal Functionality and Aesthetics
Finding the ideal placement for outside mounted blinds involves balancing function and aesthetics. Consider the blinds' projection when fully open, making sure they don't block walkways or doorways. Also, think about your window's proportions and choose a blind size that complements, not overwhelms, its dimensions. For a deeper understanding of installation, a cabinet installation guide offers helpful insights into achieving precise installations.
Handling Different Wall Types
Different wall types require specific mounting approaches. Standard drywall often uses standard screws directly into wall studs. However, surfaces like brick or textured walls may require specialized anchors and drills. Concrete walls, for example, often need masonry anchors and a hammer drill for secure mounting. This ensures your blinds are securely attached.
Mounting Hardware and Alignment Techniques
The right mounting hardware and precise alignment techniques are key for a professional finish. Choose brackets and screws appropriate for your blinds' weight and size. Use a level to ensure both horizontal and vertical alignment, ensuring smooth operation and a polished appearance.
Securing a Level and Long-Lasting Installation
A level installation isn't just for looks; it's crucial for your blinds' longevity and smooth operation. Properly aligned blinds are less likely to warp or stick. A secure installation, using the right anchors and screws, prevents shifting, especially in high-traffic areas. This ensures a durable and reliable installation for years to come.
Solving Problems Before They Derail Your Project
Even with the best planning, sometimes unexpected issues can arise during plantation blind installation. Knowing how to troubleshoot these common problems can make all the difference between a smooth DIY project and a frustrating one. This section addresses some of the real-world challenges installers face, offering practical solutions to get you back on track.
Out-of-Square Windows: Not a Deal Breaker
Older homes, especially, are notorious for having windows that are slightly out of square. This can make achieving a perfect fit with plantation blinds a bit more challenging. One effective solution is to use shims to create a level surface for your mounting brackets. Shims compensate for any unevenness in the window frame, much like leveling a wobbly table leg. Measuring at multiple points across the window—top, middle, and bottom for width; left, middle, and right for height—and using the smallest measurement also helps ensure a snug fit.
Insufficient Mounting Depth: Inside Mount Alternatives
If your window frame doesn't have enough depth for an inside mount, outside mounting offers a viable, and often preferable, alternative. Outside mounts not only work well but can also improve light control and privacy. For instance, installing the blinds with a larger outside mount can create the illusion of a deeper window frame, extending the window's perceived dimensions and maximizing functionality.
When Measurements Don't Match Reality: Double-Checking Your Work
It's disheartening when your carefully measured blinds don't seem to fit. Before you panic, double-check your initial measurements for accuracy and consistency. Ensure you're using the smallest measurement taken at multiple points across your window. For example, if your width measurements are 36 1/8 inches, 36 inches, and 35 7/8 inches, use 35 7/8 inches for your final width. Also, confirm you've correctly identified the mount type (inside or outside) and factored in any necessary overlap for outside mounts.
Working Around Window Hardware: Adapting Your Approach
Existing window hardware, like cranks or handles, can sometimes interfere with blind installation. Offset mounting brackets, which shift the blinds slightly away from the window frame, can provide the necessary clearance. Another option involves carefully measuring and notching the blinds themselves to accommodate the hardware. This requires precision, so proceed with caution. Check out our guide on quick hacks for cleaning blinds.
Handling Unusual Trim Configurations: Customized Solutions
Unique or intricate window trim can complicate plantation blind installation, often requiring a more customized solution. Extension jambs, which build out the window frame to create a flat mounting surface, can be helpful. Alternatively, you might consider an outside mount, even if you initially preferred an inside mount, to ensure proper function and a complementary look.
Achieving Proper Alignment: The Key to a Professional Look
When installing multiple blinds across several windows, proper alignment is essential for a polished, cohesive appearance. A laser level helps establish a consistent horizontal line for bracket placement, ensuring all blinds hang at the same height. Consistent spacing between each blind unit further enhances the professional look.
Troubleshooting Operational Issues: Fine-Tuning for Smooth Operation
Even after installation, minor operational issues might occur. Binding louvers are often resolved by adjusting the tilt mechanism's tension. Uneven movement when raising or lowering the blinds might indicate slight bracket misalignment, easily corrected with minor adjustments. If the blinds appear slightly off-level, shims can provide fine-tuned corrections for that perfect final touch. These simple fixes often resolve common problems, ensuring your plantation blinds operate smoothly and look professionally installed.
Understanding The Investment You're Making
Installing plantation blinds is more than just a simple home improvement project; it's a significant investment that can impact your home's value, energy efficiency, and overall comfort. This section explores the factors contributing to the higher price tag often associated with these window treatments and how proper installation ensures a worthwhile return on your investment.
Market Trends and Value Enhancement
Plantation blinds, often called plantation shutters, are experiencing a surge in popularity. This isn't a passing fad; it reflects a growing recognition of their blend of style and functionality. They offer exceptional light control, increased privacy, and a timeless aesthetic that enhances any room. This popularity translates directly to increased home value, making them a desirable feature for prospective buyers.
The global window treatment market underscores this trend. As of 2022, this market was valued at approximately USD 1.5 billion and is projected to grow at a 7.4% CAGR, reaching USD 2.7 billion by 2030. North America, specifically, saw a market value of US$4.5 billion in 2021, highlighting the strong demand in this region. For a deeper dive into these statistics, check out this report: Plantation Shutters Market.
Performance and Energy Efficiency
Beyond their aesthetic appeal, plantation blinds offer practical benefits. Their precise control over light and airflow can lead to significant energy savings, lowering your utility bills. Proper installation is crucial for maximizing these savings. A snug fit minimizes drafts and reduces heat transfer, keeping your home comfortable year-round. Over time, these energy savings can offset the initial cost of the blinds. For insights on budgeting for window coverings, see this helpful guide: How to Master Budgeting for Window Coverings.
Durability and Longevity
High-quality plantation blinds are designed for durability. However, their lifespan is directly influenced by the quality of the installation. Correctly installed blinds operate smoothly, reducing wear and tear on the mechanisms. This ensures years of flawless function, preserving their beauty and practicality. Similar to maintaining a car, proper installation is preventative maintenance, saving you money on repairs in the long run.
The Impact of Quality Installation
The installation process itself has a profound impact on the overall performance and lifespan of your blinds. Even with top-of-the-line blinds, a poor installation can compromise their effectiveness and lead to premature wear. Issues like misaligned louvers, sticking mechanisms, or even damage to the blinds themselves can arise from improper installation. Accurate measurements and secure mounting are vital for avoiding these problems.
Professional vs. DIY: Weighing the Costs
While professional installation adds to the upfront expense, it often guarantees optimal performance and longevity, maximizing your investment. Professionals possess the expertise to handle various window shapes and sizes, ensuring a precise fit that enhances both aesthetics and energy efficiency. For DIY enthusiasts, thorough preparation is essential for a successful outcome.
To help you weigh your options, consider the following comparison:
Plantation Blinds Installation: DIY vs Professional Comparison
This table provides a comprehensive comparison of costs, time, and outcomes for different installation approaches.
Factor | DIY Installation | Professional Installation | Hybrid Approach |
|---|---|---|---|
Cost | Lower upfront cost | Higher upfront cost | Moderate upfront cost |
Time | Significant time investment | Less time investment | Moderate time investment |
Complexity | Can be challenging | Easier with expertise | Moderate complexity |
Outcome Quality | Potential for errors | Higher quality, precise fit | Potential for improved DIY |
Warranty | May void manufacturer warranty | Often includes warranty | Depends on approach |
This table highlights the key differences between DIY, professional, and hybrid installation approaches, allowing you to make an informed decision based on your budget, skills, and desired outcome. A hybrid approach, combining some DIY aspects with professional guidance for critical steps, can offer a balance between cost savings and quality assurance.
Making Informed Decisions
Understanding the long-term implications of your investment helps you make sound decisions about every aspect of the installation process. It influences material choices, mounting techniques, and whether to undertake the project yourself or hire a professional. This knowledge empowers you to make the best choices for your home and budget.
Key Takeaways
Successfully installing plantation blinds comes down to careful planning and precise execution. This section summarizes the key points from this guide, offering a practical roadmap for a successful installation project. These actionable steps, coupled with an understanding of potential problems, will empower you to achieve professional-looking results.
Essential Preparation: Setting the Stage for Success
Before you even think about drilling, proper preparation is crucial. This includes gathering the necessary tools, accurately measuring your windows, and understanding the specific instructions for your blinds. It's like baking a cake – having all the ingredients and following the recipe closely is essential for a delicious result.
Gathering the right tools beforehand will make the installation process much smoother. Accurate measurements are especially important for ensuring a perfect fit, just as a well-tailored suit requires precise measurements.
Tools of the Trade: Assemble essential tools such as a measuring tape, drill, screwdriver, level, pencil, and safety glasses. Having these readily available will prevent frustrating interruptions.
Measure Twice, Cut Once: Accurate measurements are paramount. Measure your windows at multiple points to account for any variations. Double-checking will help ensure your blinds fit perfectly and operate smoothly.
Know Your Blinds: Carefully review the installation instructions provided with your specific blinds. Different manufacturers may have slightly different procedures.
Choosing Your Mount: Inside vs. Outside
Choosing between an inside mount and an outside mount is a significant decision. Inside mounts offer a clean, integrated look, while outside mounts provide better light blockage and work well for windows with shallow depths or obstructions. This choice affects both the appearance and functionality of your blinds.
Mastering Inside Mounts: Precision and Patience
Inside mount installations require precision. Ensure your window frame has sufficient depth (at least 2 inches). Accurate measurements, precise pilot holes, and careful bracket placement are essential for a seamless appearance. Think of it like building with LEGOs – each brick needs to be placed correctly for the structure to be stable.
Outside Mount Expertise: Achieving a Polished Look
Outside mounting offers flexibility and is perfect for maximum light control. Determining the correct blind overlap is essential for complete coverage. Consider the blind's projection and aesthetics, ensuring they complement the window without hindering access. Addressing different wall types, from drywall to brick, will require the right anchors and mounting hardware for a secure installation.
Troubleshooting: Overcoming Common Challenges
Even with careful planning, you might encounter challenges. Issues such as out-of-square windows, insufficient mounting depth, or unexpected hardware interference can be resolved with practical solutions. Shims can level uneven surfaces, while offset brackets provide clearance around window hardware. Being prepared for these potential issues is like having a first-aid kit on a hike – it allows you to handle unexpected situations.
Maintaining Your Investment: Ensuring Long-Term Performance
Installing plantation blinds is an investment in your home. Proper installation maximizes this investment. Regular cleaning, careful operation, and occasional lubrication will ensure your blinds operate smoothly and remain beautiful for years to come. This is akin to regular home maintenance – taking small steps can prevent bigger problems down the road.
Inside and Outside Mount Checklists: Your Installation Guides
Inside Mount Checklist | Outside Mount Checklist |
|---|---|
Verify sufficient depth | Calculate blind overlap |
Measure width at top, middle, bottom | Measure window dimensions |
Measure height at left, middle, right | Determine optimal placement |
Mark bracket locations precisely | Select appropriate anchors |
Drill pilot holes carefully | Install mounting brackets level |
These checklists simplify each installation process, highlighting the key steps for both inside and outside mounts. They serve as handy reminders, keeping you organized and helping you achieve a professional finish.
When to Call a Pro: Recognizing Your Limits
While DIY installation can be rewarding, it's important to know when to call a professional. Complex window shapes, challenging wall types, or simply a lack of confidence in your DIY skills are valid reasons to seek professional help. Professionals bring experience and expertise, ensuring a flawless installation, even in tricky situations.
By following these key takeaways, you can approach your plantation blind installation project with confidence. From precise measurements to problem-solving techniques, this guide empowers you to achieve beautiful and functional window treatments that enhance your home. Ready to transform your home? Contact Home Blinds and Floors today for a free in-home consultation: https://homeblindsandfloors.com