.avif)
.avif)
.avif)
How to Measure for Blinds: Your Expert Installation Guide
- Johann Reardon

- Jul 18, 2025
- 12 min read
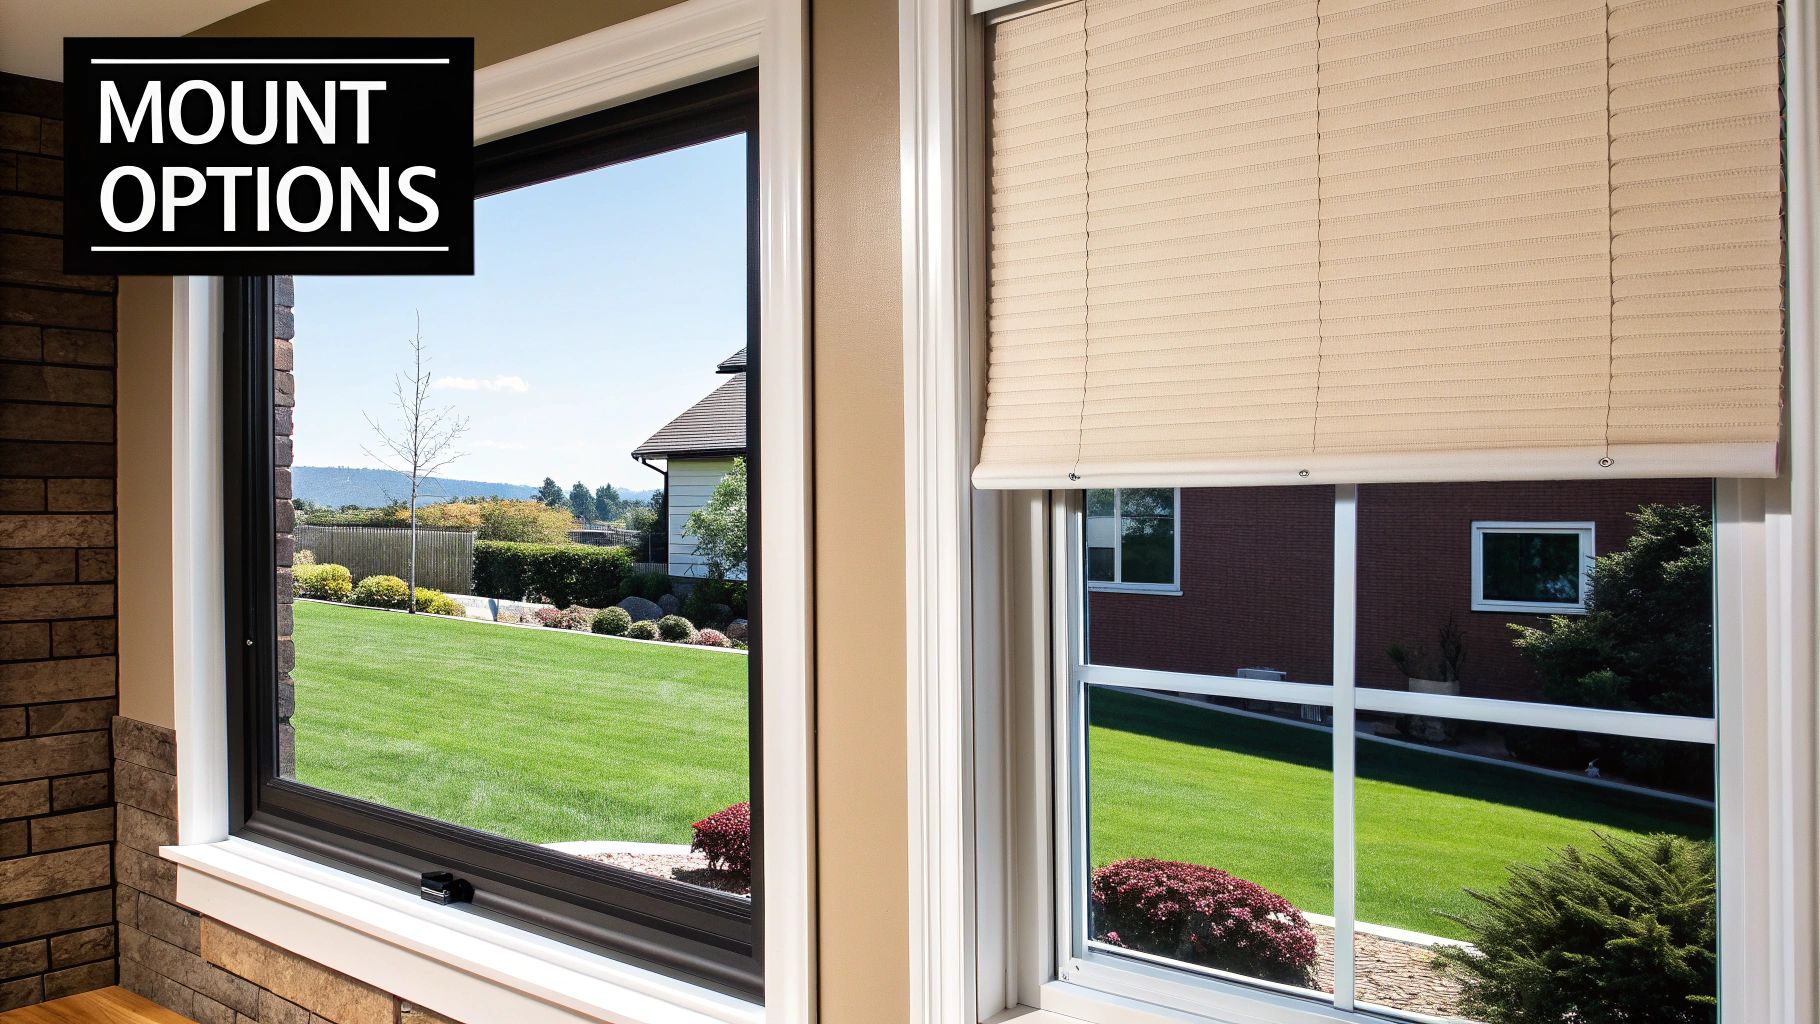
Understanding Inside Mount vs. Outside Mount (Your First Big Decision)
Before you even think about grabbing a measuring tape, you'll face a fundamental choice: inside mount or outside mount. This decision affects not only how you measure for blinds but also the overall look of your windows and how much light control you'll have. Inside mount blinds fit within the window frame itself, creating a clean, built-in appearance. This streamlined option is often preferred by architects and interior designers for its minimalist style.
However, if blocking as much light as possible and maximizing privacy are your top priorities, outside mount blinds might be a better fit. These blinds are installed on the wall or window casing, overlapping the window frame. This positioning effectively blocks more light and provides better privacy. Plus, an outside mount can give the illusion of larger windows, making a room feel more spacious. Read also: Unveiling the Secrets to Stunning Window Treatments
Assessing Your Windows for Inside Mount
Not every window works with inside mounts. You'll need enough depth within the window frame to accommodate the blinds. A good rule of thumb is to have at least 2-2.5 inches of depth for most standard blinds. However, some types, like cellular shades, might require less. Accurate measuring is key for window blinds – a proper fit is crucial for both how well they work and how they look. Traditionally, figuring out whether to mount blinds inside or outside the window frame is the first step. Inside mounts offer a clean, integrated appearance, while outside mounts provide superior light blockage. Learn more about the blinds market. Before you go any further, always double-check the manufacturer's instructions for the specific blinds you’ve chosen.
How Mounting Choice Affects Measurements
The mount type you choose determines how you measure for blinds. For inside mounts, measure the width and height at several points within the window frame to ensure an exact fit. For outside mounts, measure the window opening and then add the desired overlap on all sides. This overlap determines the final size of the blind and how much light it will cover. We'll cover the specifics of these measuring techniques in later sections. But understanding the key difference between inside and outside mount measurements right from the start is essential for a successful project.
Getting Your Tools Ready (The Professional Setup)
Accurate measurements are the foundation of perfectly fitted blinds. Forget that old fabric tape measure hiding in your junk drawer. For professional results, you'll need the right tools. A metal measuring tape, ideally with a locking mechanism, is essential. Its rigidity ensures accurate readings, preventing the sagging or stretching that can occur with flexible tape measures, potentially throwing off your measurements significantly.
Embracing Digital Precision
Consider using a digital level to check for plumb lines and ensure your window frame isn't tilted. This is particularly important for inside mounts, where slight variations can impact the final fit. Some installers even recommend smartphone apps designed specifically for measuring windows. These apps can often store measurements and calculate necessary deductions, minimizing human error. Before grabbing your tools, understanding the difference between inside and outside mounts is key. This guide to DIY Blinds Installation provides further clarification.
Lighting and Recording: Two Overlooked Essentials
Proper lighting is crucial for accurate measuring. Daylight offers the best visibility to see the exact edges of your window frame, avoiding the shadows and distortions created by artificial light. A systematic approach to recording measurements is also essential. Use a notebook or smartphone to jot down each measurement as you take it, clearly labeling each window and its corresponding dimensions. This simple step can prevent costly mistakes when ordering.
Treating Each Window as Unique
Even seemingly identical windows in the same room can have slight variations. Treat each window as a separate project, taking individual measurements for each one. This meticulous approach avoids unexpected issues and ensures a flawless fit for every blind. You might find this article helpful: How to master energy efficiency with window treatments. This attention to detail may seem excessive, but it's the mark of a truly professional approach to measuring for blinds.
Mastering Inside Mount Measurements (The Three-Point System)
Precise measurements are essential for inside mount blinds. This technique, often used by professional installers, ensures a perfect fit and smooth operation. It involves measuring the width at three specific points—the top, middle, and bottom—within the window recess. This three-point system helps account for any variations or inconsistencies in the window frame.
Measuring Width: The Three-Point Approach
The infographic below demonstrates the crucial first step: measuring your window's width. Note how the tape measure goes across the window frame, capturing the dimension at a single point.
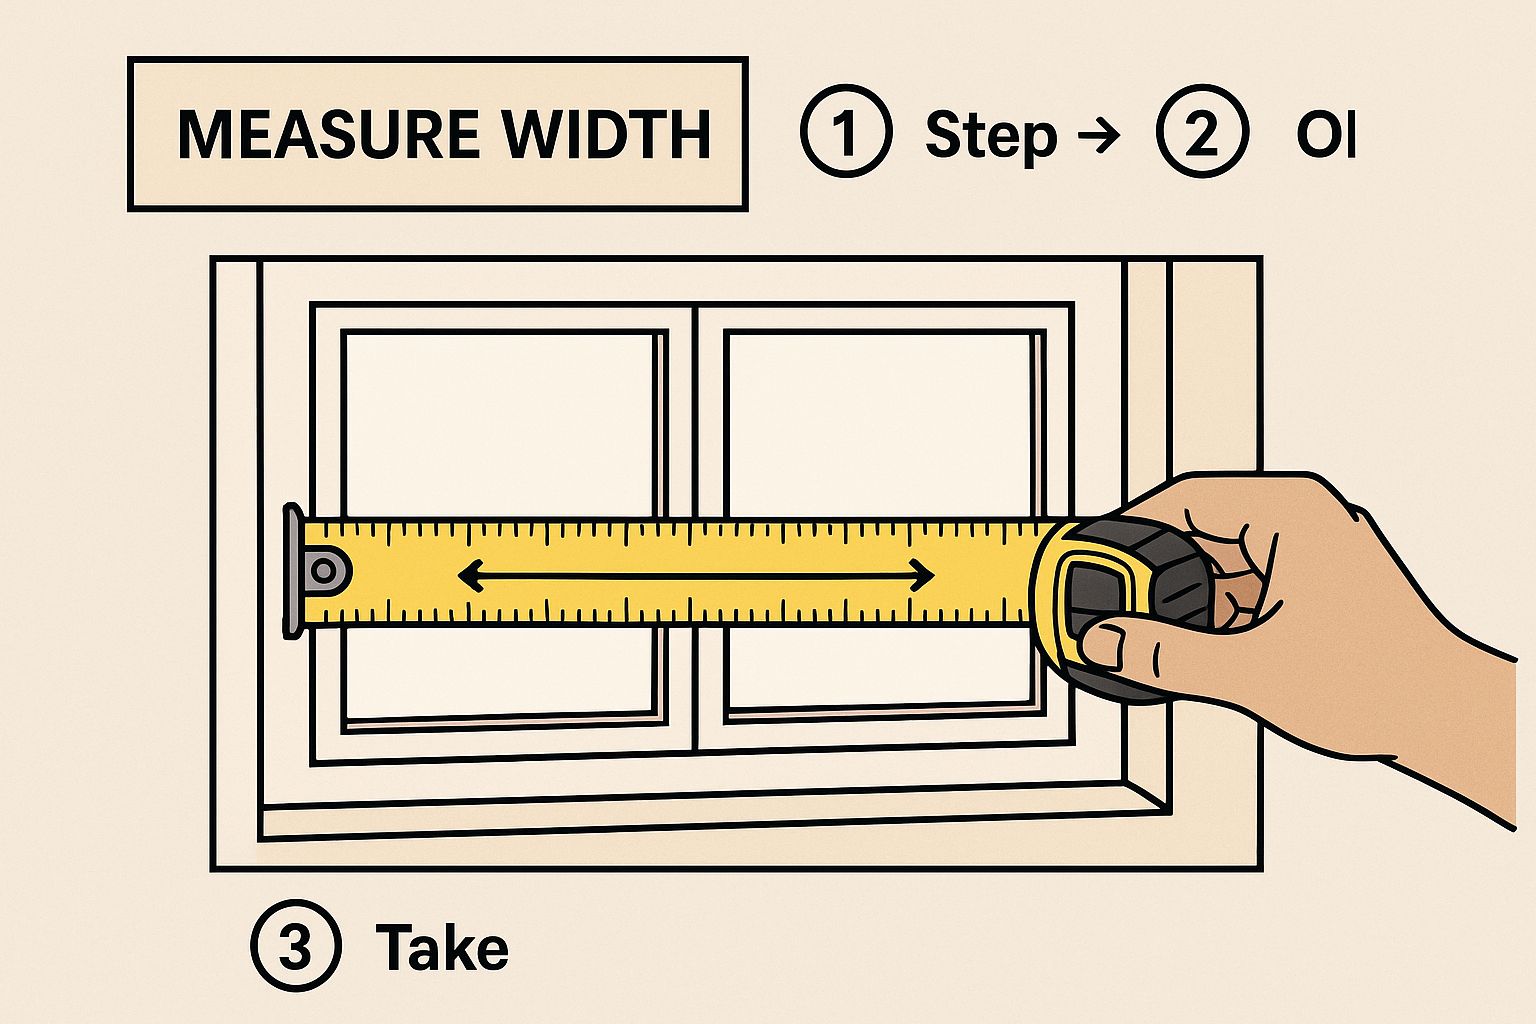
Visualizing this process highlights the importance of accurate width measurements for a snug fit. Repeating this at the top, middle, and bottom ensures you capture the narrowest measurement, the most critical factor for inside mounts.
Measuring Height: Maintaining Consistency
Similar to width, height measurements require the same three-point precision. This time, focus on the left, center, and right sides of the window recess. Record each measurement diligently. Even small discrepancies can impact how well your blinds fit and function.
This detailed process is necessary because window frames are rarely perfectly square. Older homes, in particular, may have variations due to settling or age. The three-point system helps identify these subtle differences, ensuring a smooth fit.
Why the Smallest Measurement Matters
After taking your width measurements at the top, middle, and bottom, use the smallest of the three for your order. This ensures your blinds fit within the narrowest part of the recess, preventing them from binding or rubbing against the frame.
The same principle applies to height, using the shortest of the three measurements. The most critical measurements for inside mounts are the width and height of the window recess, each taken at three points. For width, measure the top, middle, and bottom. For height, measure the left, center, and right. Use the smallest width measurement to ensure the blind fits inside the frame without any issues.
A common practice is to deduct approximately 1/8 inch from the width for inside mounts. This small deduction allows for smooth blind operation. More information regarding industry standards can be found at Fortune Business Insights.
Handling Irregularities and Obstructions
What if your window sill isn’t level or there are window cranks or locks within the frame? For uneven sills, take the height measurement from the highest point. This ensures the blinds will clear the entire sill when lowered.
For obstructions like cranks or locks, measure as close to them as possible, noting their location. This allows you to account for the obstruction when selecting the best blind style and size. These considerations demonstrate the value of professional measurements.
The following table provides a helpful checklist for taking inside mount measurements:
Inside Mount Measurement Checklist
This checklist shows the measurement points and recommended deductions for inside mount blinds.
Measurement Point | Where to Measure | Deduction Required | Notes |
|---|---|---|---|
Width (Top) | Across the top of the window recess, from inside edge to inside edge | Potentially 1/8 inch | Ensure the tape measure is level |
Width (Middle) | Across the middle of the window recess, from inside edge to inside edge | Potentially 1/8 inch | Check for any obstructions |
Width (Bottom) | Across the bottom of the window recess, from inside edge to inside edge | Potentially 1/8 inch | Account for variations in the sill |
Height (Left) | From the top inside edge of the window recess to the sill | None | Measure from the highest point of the sill if uneven |
Height (Center) | From the top inside edge of the window recess to the sill | None | Ensure accurate vertical measurement |
Height (Right) | From the top inside edge of the window recess to the sill | None | Note any obstructions like window cranks |
Remember to use the smallest width and height measurements for your final order. This table helps ensure you collect all the necessary information for a perfect fit.
Nailing Outside Mount Coverage (Maximum Light Control Strategy)
Outside mount blinds offer a fantastic way to maximize light control and boost your home's visual appeal. It's not just about getting bigger blinds; it's about strategically covering the window area. This involves carefully calculating the ideal extension beyond your window frame.
A good starting point is adding 2-3 inches to each side of the window frame for the width and 3 inches above and below for the height. However, customizing these measurements is essential for a perfect fit.
Customizing Your Outside Mount Measurements
While the standard extensions provide a helpful guideline, they can be adjusted. If complete light blockage is your goal, consider increasing the overlap. If your window is close to a wall or other architectural element, you may need to adjust the extension on one side to maintain a balanced look. Understanding the general principles behind measuring for projects like kitchen cabinets can be surprisingly helpful when mastering inside mount measurements.
Handling Tricky Scenarios and Maximizing Aesthetics
Outside mounts can present unique challenges, especially with windows near corners or those with limited space above or below. In these situations, balancing proportional aesthetics with sufficient light control becomes key. Think about how the extended blinds will appear in relation to the entire wall and any nearby windows. Coordinating measurements across multiple windows creates a cohesive and visually pleasing result. For more tips on managing heat, check out this article on the best blinds for keeping heat out.
Visual Tricks and Considerations for Multiple Windows
Outside mounts can also create the illusion of larger windows. Extending the blinds beyond the frame draws the eye outward, making the window seem bigger and adding a sense of spaciousness. A standard recommendation is to add 2-3 inches to each side of the frame for width and about 3 inches above and below for height. This ensures full coverage and effective light control. For more in-depth statistics on window coverings, see this market report. This meticulous planning is particularly crucial when working with multiple windows in the same room. Consistent overlap across all windows establishes visual harmony and a polished look. This comprehensive approach to outside mount measurements ensures both maximum light control and an aesthetically pleasing outcome.
Tackling Tricky Windows (Special Cases Made Simple)
Not every window is a perfect rectangle. This section guides you through measuring for blinds on those tricky windows that seem to defy standard rules. From bay windows to French doors and arched windows, we'll cover the techniques you need.
Arched, Angled, and Awkward: Conquering the Curves
Arched windows present a unique challenge. Do you want to follow the arch's curve or install a rectangular blind above it? Following the arch requires precise measurements of the curve. For a rectangular blind, treat it like a standard window, measuring the area within the frame where the blind will sit. Learn more in our article about the benefits of solar shades.
Skylights, especially angled ones, can be tricky. Accuracy is paramount. Measure the width and height at multiple points to account for any slopes. Like arched windows, decide if you want the blind to fit the exact shape or opt for a standard rectangular fit.
Older homes often have vintage windows that aren't perfectly square. The three-point measurement system becomes even more important. Measure the width at the top, middle, and bottom. Use the smallest measurement to ensure a proper fit. Repeat this for the height, considering any frame unevenness.
Tilt-In, Casement, and Sliding: Dealing With Different Operations
Tilt-in windows require attention to ensure the blinds don't interfere with the tilting mechanism. An inside mount is usually preferred. Precise measurements ensure smooth operation.
Casement windows that open inward present a similar challenge. Consider the swing direction and choose a blind style that doesn't obstruct the opening. Accurate measurements prevent interference between the blinds and window hardware.
Sliding patio doors require a different approach. Measure the entire door opening's width and height, including hardware and frames. Consider one large blind or multiple smaller blinds for greater control.
Grilles, Depths, and Other Details: The Finishing Touches
Windows with built-in grilles (the decorative dividers) require careful consideration. Decide whether to mount the blinds inside or outside the grilles, adjusting your measurements accordingly.
Unusual window depths might limit inside mount options. Always check the manufacturer's recommendations for minimum depth requirements for your chosen blind style.
By addressing these special cases and following these instructions, you can confidently tackle any window. Ensure a professional finish and perfectly functioning blinds that enhance your home's beauty and comfort.
Why Perfect Measurements Matter More Than You Think
Accurate measurements are essential when it comes to window blinds. They're not just about getting a perfect fit, but also about saving money and enhancing your living space. Properly fitted blinds are key for insulation, light control, and ultimately, lower energy bills. This precision translates to real cost savings throughout the year.
The Impact of Precision on the Blinds Industry
The growing custom blinds industry reflects the importance of precise measurements. Manufacturers are investing in measurement education and digital tools to empower customers and ensure satisfaction. This focus highlights the direct link between accurate measurements and a positive customer experience.
Many companies now offer online guides and videos demonstrating how to measure for blinds. They've also developed apps designed to simplify the process. These resources make accurate measuring more accessible for everyone.
The Hidden Costs of Measurement Errors
Measurement errors can lead to costly and frustrating issues. Inaccurate measurements can result in ill-fitting blinds that need to be returned, leading to shipping fees and delays. This leaves your windows bare, compromising privacy and light control.
Furthermore, poorly fitted blinds reduce their energy-saving benefits. Studies show that gaps can decrease energy efficiency by up to 20% by allowing heat transfer. This negates one of the primary advantages of having blinds in the first place.
The market for window blinds is expected to reach USD 3.8 billion in 2025, growing to USD 6.15 billion by 2033. These figures, available here, underscore the increasing demand for blinds and the crucial role of accurate measurements within this expanding market. For further information on energy-efficient window treatments, check out this helpful guide: How to master energy-efficient window treatments.
Maximizing Lifespan and Functionality Through Accurate Measurement
Precise measurements significantly contribute to the lifespan of your blinds. A properly fitted blind operates smoothly, minimizing wear and tear. This results in a longer-lasting product that functions correctly for years. Investing a few extra minutes in careful measuring offers both practical and financial benefits in the long run.
Accurate measurements also enhance the aesthetic appeal of your blinds. A perfectly fitted blind looks polished and professional, complementing your home's décor. This attention to detail creates a more attractive and harmonious interior. The improved visual appeal further emphasizes the value of precise measurements.
Avoiding the Most Expensive Measuring Mistakes
Even the most detail-oriented DIYers can make common measuring mistakes when figuring out how to measure for blinds. This section identifies those errors that can cost you the most, both in money and frustration, and offers clear strategies to avoid them.
The Single Measurement Trap
Measuring only once is asking for trouble. Windows, especially in older homes, are rarely perfectly square. Subtle variations can occur, and a single measurement might miss these critical differences. Always measure at multiple points, as described in the previous sections, to account for any inconsistencies. This multi-point approach is a cornerstone of accurate measuring.
Overlooking Trim and Molding
Trim and molding can significantly impact your measurements, especially with inside mounts, where the blinds fit within the window frame. Failing to account for these elements can result in blinds that are too wide and don't fit correctly. Carefully consider any protruding trim or molding when taking your measurements. If needed, subtract the width of the trim from your window measurements to guarantee a snug fit.
Assuming Identical Windows
Even windows in the same room can have slight size differences. Never assume all windows are the same. Measure each window individually to ensure accurate dimensions for each blind. This seemingly minor step can save you major headaches later.
Double-Checking and Inconsistent Measurements
Double-checking your measurements is essential. If measurements seem inconsistent, remeasure. It's better to spend a few extra minutes verifying than to order the wrong size. This attention to detail can prevent costly errors and ensure a perfect fit.
Knowing When to Consult an Expert
If you’re struggling with challenging windows or feel overwhelmed by the measuring process, consider consulting a professional. Sometimes, the cost of a professional measurement is far less than the cost of re-ordering incorrect blinds. Expert guidance can be invaluable, particularly for complex window shapes or unusual installations.
Recording and Communicating Clearly
Clearly record your measurements, labeling each window and its corresponding dimensions. This prevents confusion and guarantees accurate ordering. When communicating with suppliers, provide detailed information and clarify any questions. Clear communication is key to getting exactly what you need.
Understanding Manufacturer Specifications and Red Flags
Carefully review the manufacturer's specifications for your chosen blinds. Different blind styles may have specific measurement requirements. Pay close attention to any deductions or adjustments recommended by the manufacturer. Before ordering, look for red flags like drastically different measurements or inconsistencies that indicate a need to remeasure.
To help you further avoid costly errors, take a look at the table below:
Common Measurement Errors and Solutions A guide to identifying and preventing the most frequent measuring mistakes that lead to poor-fitting blinds
Common Error | Why It Happens | How to Prevent | If It Happens |
|---|---|---|---|
Single Measurement | Windows are rarely perfectly square. Variations in size can be missed. | Measure at multiple points (top, middle, bottom) for width and height. | Remeasure, taking measurements at multiple points. |
Ignoring Trim/Molding | Trim can interfere with inside mount blinds. | Measure the window opening, accounting for trim projection. | Consider an outside mount or order a smaller blind size. |
Assuming Identical Windows | Subtle size differences can exist between windows. | Measure each window individually, even in the same room. | Remeasure each window to confirm accurate dimensions. |
Inconsistent Measurements | Rushing or inaccurate reading of measuring tools. | Double-check measurements, and remeasure if discrepancies exist. | Retake measurements, paying close attention to detail. |
This table summarizes the most common measurement errors, their underlying causes, preventive measures, and corrective actions. By understanding these potential pitfalls, you can ensure your blinds fit perfectly.
Ready for perfectly fitted blinds? Contact Home Blinds and Floors (https://homeblindsandfloors.com) today for a free in-home consultation. Our team of experts will guide you through the process, ensuring your new window treatments fit your style, budget, and functional needs. Serving the Delmarva Peninsula for over 20 years, we’re your local source for custom window solutions.


Comments