.avif)
.avif)
.avif)
How to Clean Window Blinds: Easy Methods That Work
- Johann Reardon

- Jul 18, 2025
- 16 min read
Why Your Blinds Need More Attention Than You Think
Let’s be honest: cleaning window blinds often falls to the bottom of our to-do lists, right next to dusting the top of the refrigerator. It feels like a minor task that's easy to put off. However, letting this chore slide does more than just affect your home's appearance; it quietly undermines your living environment. Those seemingly harmless layers of dust are a cocktail of skin cells, pet dander, pollen, and other airborne particles that constantly circulate through your home.
When you invest in beautiful custom window coverings, like the ones from Home Blinds & Floors, you're choosing a key design element for your space. But letting them get dirty can make an entire room feel uncared for, completely diminishing the impact of your carefully selected décor.
The Hidden Impact on Your Home's Health
Beyond looks, the real concern is your indoor air quality. Every time you open a window or your HVAC system kicks on, air currents stir up the dust settled on your blind slats. This sends microscopic particles right back into the air you and your family breathe. For anyone with allergies, asthma, or other respiratory sensitivities, this can be a major trigger for their symptoms. Just think of your blinds as hundreds of tiny shelves, all collecting pollutants day after day. A quick, occasional swipe often just pushes this dust around instead of actually removing it.
This buildup is more significant than most people realize. In a typical home, dust levels on blinds can reach several grams per square meter in just a few weeks. Research shows this accumulation can worsen respiratory issues, which makes learning how to clean window blinds a critical health practice, not just a cosmetic one. Most experts recommend a thorough cleaning every 3 to 6 months, though you may need to do it more often if you have pets or live near a busy street.
Protecting Your Investment
Proper, regular cleaning is also about protecting the money you spent on your blinds. Over time, grime and dirt can become abrasive, potentially scratching or discoloring the finish on materials like wood, faux wood, or even metal. At Home Blinds & Floors, we always tell our clients that consistent maintenance is the best way to make sure their new blinds look great for years.
Understanding how to clean window blinds effectively preserves not just their beauty but also their mechanical function. Keeping them clean helps prevent future issues with the cords and tilting mechanisms. By giving them the attention they deserve, you ensure they remain a valuable and attractive feature in your home for a long, long time.
Gathering Your Blind Cleaning Arsenal
Before you start scrubbing and wiping, let's talk about tools. Having the right equipment on hand is the difference between a frustrating afternoon and a genuinely satisfying clean. The good news is you don't need a bunch of expensive gadgets; in fact, some of the best tools for learning how to clean window blinds are probably already hiding in your cupboards.
The Everyday Essentials
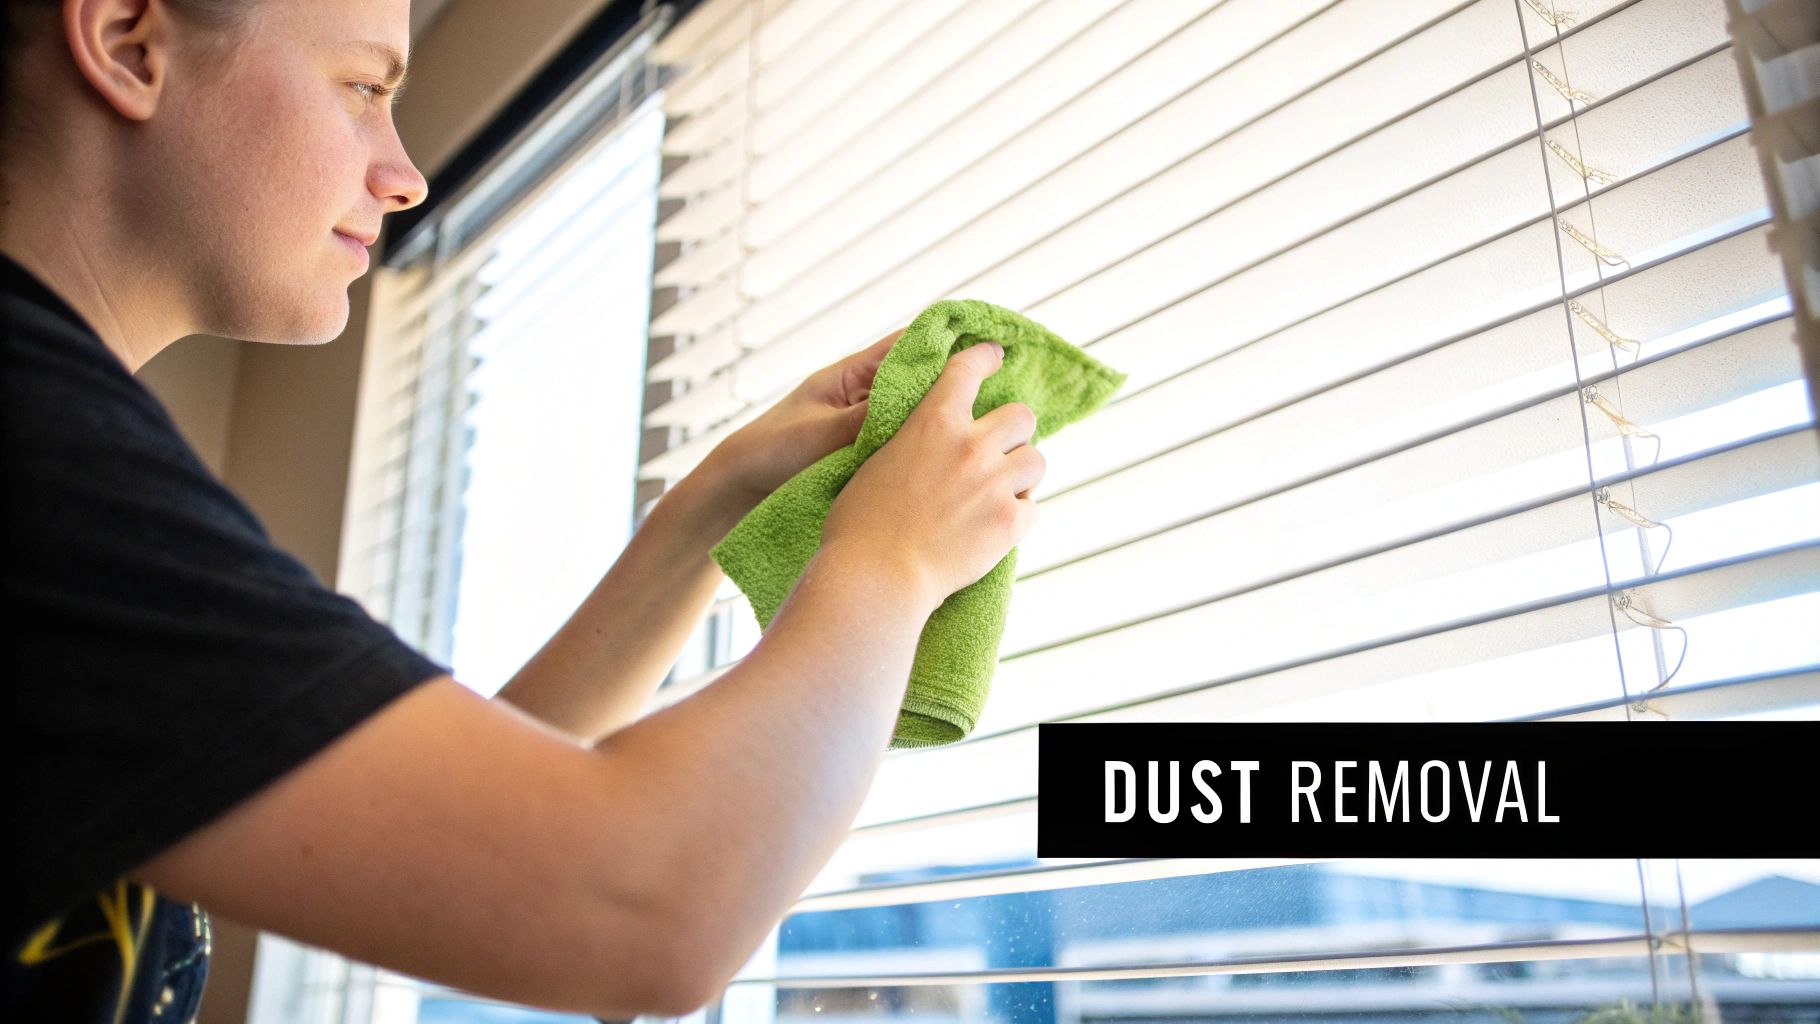
For routine dusting and light maintenance, a few simple items are your best friends. A good-quality microfiber cloth is a must-have. Its tiny fibers are designed to grab and hold dust instead of just pushing it around. I’ve also found that an old, clean sock slipped over your hand works wonders for quickly wiping down individual slats—it’s a simple trick that really speeds things up.
If you have cellular shades or just need to reach high spots, a vacuum with a soft brush attachment is perfect. It gently lifts away dust and debris from delicate surfaces without causing any damage.
Stepping Up Your Cleaning Game
When it's time for a deeper clean to tackle more than just dust, you’ll need to expand your toolkit slightly. A bucket filled with warm water and a little mild dish soap is the foundation for a great cleaning solution that works on many blind types, especially vinyl and metal.
For stubborn grime or greasy buildup, a 50/50 mixture of white vinegar and water can work wonders without relying on harsh chemicals. This simple infographic breaks down the basic process for using a homemade cleaning solution.
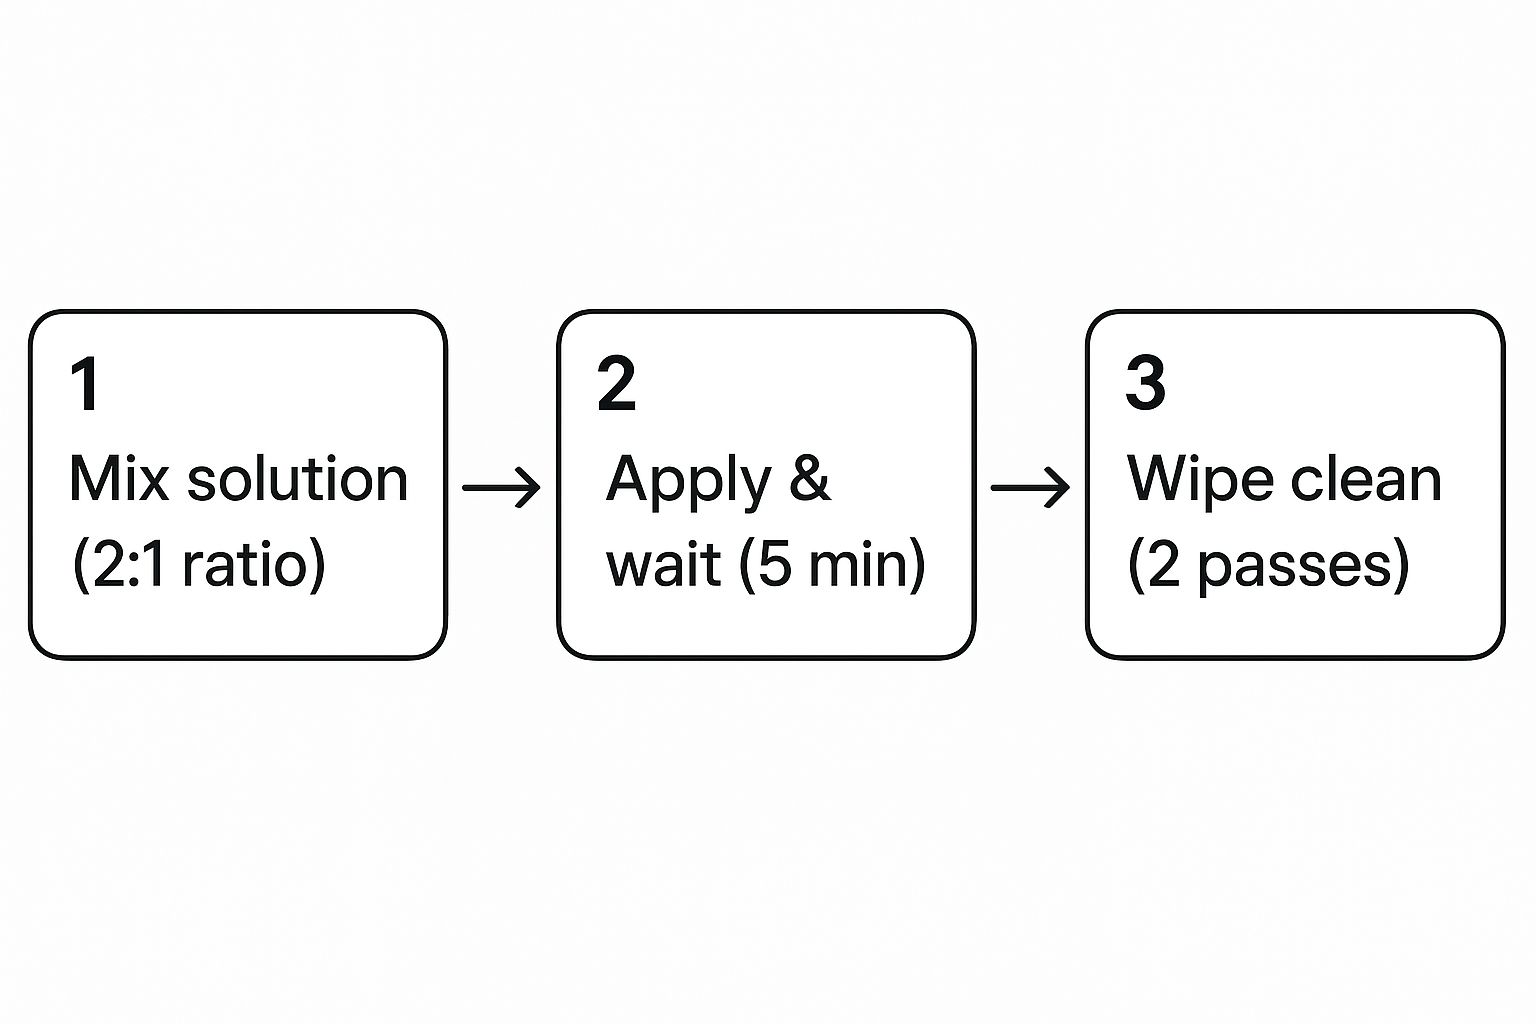
As the visual guide shows, a simple, methodical approach—mixing, applying, and wiping—is often all you need. It proves you don't need complicated procedures to get great results. If you're dealing with delicate materials like real wood or fabric, learning how to choose the right cleaning products is a key step that can prevent accidental damage.
To make sure you're using the right gear for your specific blinds, here’s a quick comparison of the tools we recommend for different materials.
Blind Material | Primary Tools | Cleaning Solution | Special Considerations |
|---|---|---|---|
Wood Blinds | Microfiber cloth, soft brush vacuum attachment, wood cleaner/polish | Mild wood-safe soap and water (use sparingly) | Avoid excess water, which can warp, stain, or damage the wood finish. Never soak. |
Faux Wood/Vinyl | Microfiber cloth, sock, bucket, sponge | Warm water with mild dish soap; 50/50 vinegar-water mix | Very durable and water-resistant. Can be washed more thoroughly than real wood. |
Metal/Aluminum | Blind duster tool, microfiber cloth, sponge | Warm water with mild dish soap; 50/50 vinegar-water mix | Be gentle to avoid bending or creasing the slats. Can be removed for deep soaking if needed. |
Fabric/Cellular | Soft brush vacuum attachment, can of compressed air, hair dryer (cool setting) | Spot treat with a damp cloth and mild soap. | Avoid saturating the fabric. Use compressed air to blow dust out of honeycomb cells. |
This table highlights that while some tools are universal, the cleaning solutions and techniques need to be adjusted based on the blind's material to prevent damage and achieve the best clean.
Tools Worth the Investment
While DIY solutions are effective, a couple of specialty tools can be real game-changers. A blind duster tool, which has several microfiber-covered "fingers," lets you clean multiple slats at once, which can cut your cleaning time in half. For anyone with fabric or cellular shades, a can of compressed air is amazing for blasting dust out of those tight honeycomb cells where a vacuum brush can’t quite reach.
Keeping these supplies organized makes the whole job feel less like a chore. A simple cleaning caddy can hold your cloths, sprays, and brushes so everything is ready when you are. At Home Blinds & Floors, we find that our clients who keep their tools accessible are more likely to do the regular upkeep needed to keep their custom blinds and shades looking fantastic. Whether you have classic faux wood or modern aluminum blinds, gathering your arsenal first sets you up for a smooth and stress-free cleaning session.
Wood and Faux Wood Blinds: Handle With Care
Wood blinds add a natural, timeless warmth to any room, making them a go-to for anyone wanting a classic look. But because they're made from real wood, they need a special cleaning approach. Unlike their tougher lookalikes, real wood is very sensitive to moisture. One wrong move with a wet cloth can cause permanent warping, discoloration, or damage to the finish. This is why knowing how to clean window blinds made of wood is a crucial skill for protecting your investment.
The Gentle Approach to Real Wood
The absolute number one rule for real wood blinds is to avoid excessive moisture at all costs. Think of it like caring for a nice piece of wooden furniture—you wouldn't douse it in water, and the same idea applies here. For regular dusting, the simplest method is often the best. Close the blinds all the way and gently wipe them from top to bottom with a clean, dry microfiber cloth or a classic feather duster. Then, flip the slats the other way and do it again to clean the other side. A vacuum with a soft brush attachment is also a great tool for lifting dust without scratching the finish.
When you run into stickier spots or grime that dusting just won't fix, you have to be very careful. Lightly dampen a microfiber cloth with a wood-safe cleaner or a very diluted mix of mild soap and water. When I say lightly, I mean the cloth should feel almost dry. Gently wipe only the problem area, then immediately go over it with a completely dry cloth to soak up any leftover moisture. Never spray liquid directly on the blinds; the drops can seep between the slats and into the cord mechanisms, leading to long-term problems.
Faux Wood: The Durable Alternative
This is where faux wood blinds really show their strength. They're designed to look like beautiful real wood but are made from composite or PVC materials, which makes them much more forgiving. If you have faux wood blinds in a high-moisture spot like a kitchen or bathroom, you're in luck—they can handle a much deeper clean. They are built to resist warping and fading, so you don't have to live in fear of water damage.
For a deep clean, feel free to use a cloth dampened with a mix of warm water and a few drops of mild dish soap. Since these blinds aren't porous, you can be a bit more generous with the water than you would with real wood, though you should still try not to soak them to protect the internal parts. Wipe each slat individually, and you’ll see grime come right off. Their smooth surface also means they don't trap as much pet hair and dust, which is a huge plus for families with furry members. You can discover more easy tips for sparkling windows in our related guide.
Dealing with Stubborn Grime and Maintenance
So what do you do when you find a really stubborn, greasy spot on your kitchen blinds? For faux wood, a 50/50 mixture of white vinegar and water can be very effective for cutting through grease. This is a bit riskier for real wood. Always test any cleaning solution on a hidden spot first, like the back of the bottom slat, to make sure it doesn't mess up the finish. Using furniture polish on real wood blinds is generally not recommended, as it can build up over time and actually attract more dust.
Ultimately, the best way to keep both wood and faux wood blinds looking perfect is consistency. Regular, gentle dusting prevents the kind of heavy buildup that requires a more intense—and potentially risky—deep clean. At Home Blinds & Floors, we often see beautiful custom blinds and shades last for decades just because the owners practiced good maintenance. By understanding the material you’re working with, you can confidently keep your blinds looking as amazing as the day they were installed.
Metal and Aluminum Blinds: The Surprisingly Forgiving Option
Metal and aluminum blinds are the workhorses of the window treatment world. They’re tough, practical, and often easier on the wallet, but they can become magnets for dust and grime, especially in places like the kitchen. The great thing is their sturdy nature makes them one of the simplest types to deep clean. Unlike wood, which can be damaged by water, metal blinds can handle a full-on soak, which is a lifesaver for getting rid of serious buildup.
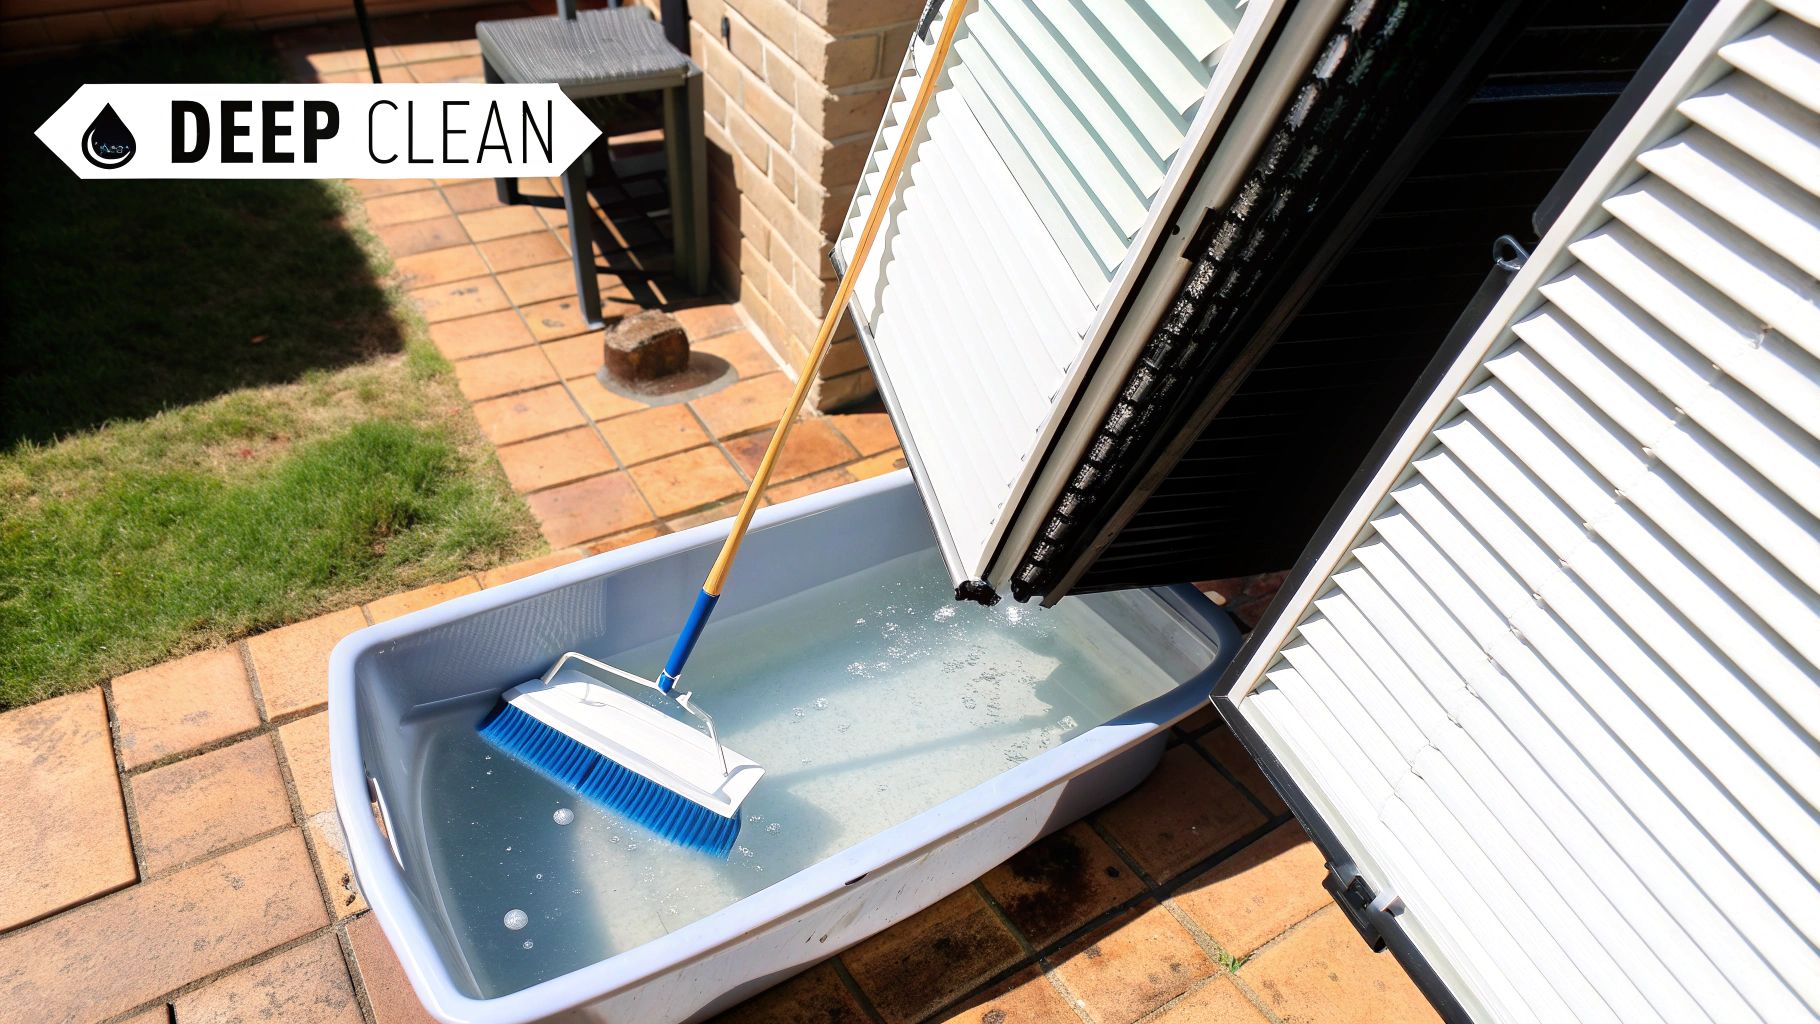
Taking the Plunge: The Bathtub Method
For blinds that need more than a quick dusting—like kitchen blinds coated in a thin layer of grease or bathroom blinds that have seen better days—the bathtub method is incredibly effective. It might sound like a major undertaking, but it’s a surprisingly simple way to get them looking brand new again.
Many homeowners I've talked to swear by this approach:
Take the Blinds Down: First, carefully remove the blinds from their mounting brackets. This is usually a straightforward process, but work gently to avoid accidentally bending any of the thin aluminum slats.
Set Up the Bath: To protect your tub, lay an old towel or a rubber mat in the bottom. Fill the tub with a few inches of warm water and add a good squirt of mild dish soap, giving it a good swish to get some suds going.
Let Them Soak: Fully submerge the blinds in the soapy water. Let them sit for about 20-30 minutes. This break allows the soap to do the hard work of breaking down stubborn grime and grease for you. If your blinds are extra grimy, adding a cup of white vinegar to the bath can help dissolve the buildup even faster.
Wipe and Rinse: After the soak, grab a soft cloth or sponge and wipe down each slat on both sides. The grime should slide right off. Once they're clean, drain the tub and give the blinds a thorough rinse with cool water from your showerhead. This is a crucial step to prevent leaving behind any streaky soap residue.
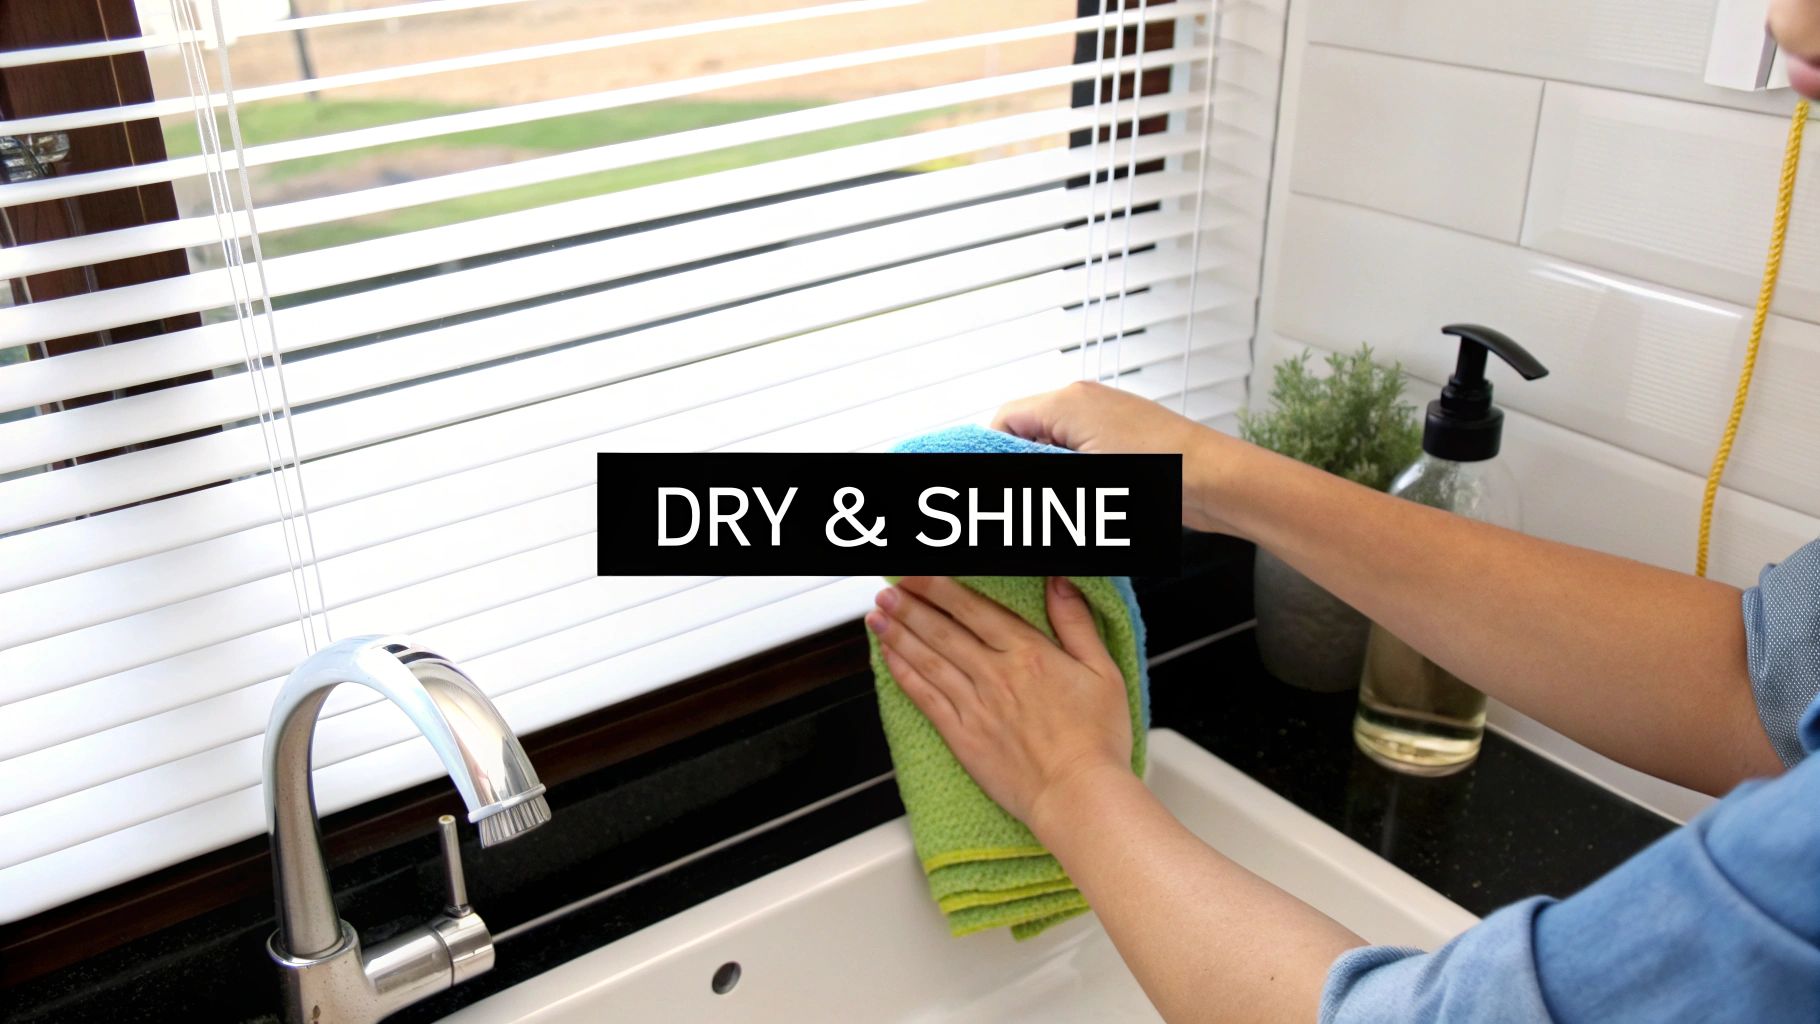
Preventing Water Spots and Handling Damage
A common mistake after a deep clean is improper drying, which results in those frustrating water spots. To get a spotless finish, hang the blinds over your shower curtain rod or a clothesline outside. Pat them down with a microfiber cloth to get rid of as much water as possible. For an even quicker dry, you can point a fan at them. Drying them completely also helps stop any rust from forming on the metal parts. For more ideas, Home Blinds & Floors has a great resource where you can learn a quick hack for cleaning blinds.
Sooner or later, a metal slat might get bent. The key is to be gentle. For small bends, you can often work them back into shape with just your fingers. If you’re dealing with a more serious crease, lay the slat on a flat, hard surface and gently press it with a ruler or another straight edge. If a slat is damaged beyond repair, it's usually more practical to replace the entire set of blinds, as tracking down a single matching slat is often a challenge. Careful cleaning is the best way to make your aluminum blinds last, ensuring even affordable choices from our wide product selection look fantastic for years to come.
Fabric and Cellular Shades: The Delicate Touch Approach
Fabric shades, from elegant Roman shades to energy-saving cellular (or honeycomb) styles, bring a soft, inviting feel to a room. But their delicate construction means they need a more careful cleaning method. It's a different ballgame compared to durable materials like those in our guide on vinyl vs. aluminum blinds. A wrong move can cause shrinkage, ugly water stains, or lasting damage, especially on pricey custom window coverings.
Regular Maintenance for Lasting Beauty
The secret to keeping fabric shades looking their best is consistent, light cleaning. A quick weekly dusting prevents dust, pet hair, and pollen from working their way deep into the fibers, which makes deep cleaning much harder later on.
Here are a few ways to keep them fresh:
Your Vacuum Is Your Best Friend: The best tool for the job is your vacuum cleaner fitted with a soft brush attachment. Glide it gently over the shade's surface, making sure not to press too hard. This is especially good for cellular shades, as it cleans the surface without crushing the delicate cells.
Blow Away Trapped Debris: We all know those honeycomb cells are magnets for dust, pollen, and even tiny insects. A can of compressed air or a hairdryer on a cool, low setting works wonders here. Just point the nozzle into the cells and blow the debris out the other side.
Feather Dusters Work, Too: For a very light and quick dusting, particularly on flat Roman shades, a simple feather duster is a great option.
Tackling Stains and Grime
When you see a spot or stain, your first thought might be to attack it with a wet cloth. Pause right there. Many fabrics used for shades aren't designed to get wet and can end up with water rings or color bleeding. Always check the manufacturer’s care instructions first. If you can't find them, it's safest to assume the fabric is dry-clean only. At Home Blinds & Floors, we make a point to provide these specific care details with our installations as part of our service.
If you've confirmed your shades can handle a little moisture, spot cleaning is your go-to method.
Start by mixing a tiny drop of clear, mild dish soap with water and dampen a clean, white microfiber cloth. Gently blot the stain—never rub. Rubbing can spread the stain and mess up the fabric's texture. Keep blotting with a clean, damp part of the cloth until the stain is gone. To finish, blot the area with a dry cloth to soak up any leftover moisture.
When to Seek Professional Help
Knowing how to clean window blinds is one thing, but knowing your limits is just as important. If your shades are very dirty, have stains that won't budge, or are made of a very delicate material like silk or linen, trying to clean them yourself is a big risk.
Professional blind cleaners use special methods that are much safer and more effective. Techniques like ultrasonic cleaning baths and eco-friendly solutions have shown up to 30% higher effectiveness at removing stubborn dirt. This can extend the life of your blinds by 15-20% over five years. You can learn more about these advanced methods and their impact in this in-depth industry report. For high-end fabric treatments, calling in a professional is often the smartest move to protect your investment.
Knowing When to Call the Professionals
While tackling home projects yourself can be incredibly rewarding, there are times when knowing your limits is the smartest move you can make. When it comes to learning how to clean window blinds, recognizing when a job is beyond a simple DIY effort can save you from costly mistakes and frustration. This is especially true for delicate materials or expensive custom window coverings where one wrong move could lead to permanent damage. The decision to call a professional isn't giving up; it's a strategic choice to protect your investment.
The Warning Signs Your Blinds Need an Expert
So, how do you know when to put down the microfiber cloth and pick up the phone? There are several clear indicators that your blinds need more than just your own time and effort. Keep an eye out for these tell-tale signs.
Stubborn, Set-In Stains: If you've tried gentle spot-cleaning on a fabric shade and the stain isn't budging—or worse, it's spreading—stop immediately. Professionals have specialized solvents and techniques for lifting tough stains without causing damage.
Extensive Grime or Nicotine Buildup: Years of accumulated dust, grease, or nicotine can create a sticky, yellowed film that’s nearly impossible to remove without professional-grade equipment.
Delicate or High-End Materials: If you own silk Roman shades, intricate cellular shades, or unsealed real wood blinds, the risk of DIY damage is high. These materials often require specific cleaning methods, like ultrasonic cleaning, that you simply can't replicate at home.
Widespread Mold or Mildew: Small spots might be manageable, but if you notice significant mold growth, it’s a job for an expert who can safely remove it without spreading spores throughout your home.
When your blinds are beyond a simple DIY clean, or you prefer expert handling, exploring general professional cleaning services can be a great option for tackling these tougher challenges.
To help you weigh your options, here’s a quick comparison of what to expect from DIY cleaning versus hiring a professional service.
Method | Initial Cost | Time Investment | Results Quality | Best For |
|---|---|---|---|---|
DIY Cleaning | Low (cost of supplies) | High | Varies; good for light dust | Regular upkeep, minor spots, sturdy materials like vinyl or aluminum. |
Professional Cleaning | High (service fees) | Low | Excellent; deep, thorough cleaning | Deep-seated grime, delicate fabrics, mold removal, and large jobs. |
Ultimately, while professional services have a higher upfront cost, they deliver superior results and save you significant time, especially for challenging cleaning situations.
What Professionals Offer That You Can't
The growing trend toward professional blind cleaning isn't just about convenience; it's about superior results and preservation. The global blind cleaning services market was valued at USD 1.2 billion in 2023 and is projected to more than double by 2033, driven by a greater focus on indoor hygiene. This growth reflects a real demand for the specialized services that experts provide. You can read the full research about this market trend to understand its rapid expansion.
Professional services often use ultrasonic cleaning, a process where blinds are submerged in a tank and high-frequency sound waves create microscopic bubbles that gently dislodge dirt from every nook and cranny. This method is incredibly effective and safe for most blind types. At Home Blinds & Floors, we always recommend professional cleaning for our premium custom installations to ensure they maintain their pristine condition for years to come.
In fact, one of the most important steps to ensure a long life for your window treatments starts long before cleaning. You might be interested in our guide on how to measure for blinds, as a perfect fit reduces wear and tear from the very beginning. Ultimately, calling a pro is an investment in the longevity and beauty of your window treatments.
Maintenance Habits That Make All the Difference
The real secret to beautiful blinds isn’t found in an annual deep-cleaning marathon. It’s the small, consistent habits that prevent major grime from building up in the first place. Think of it like maintaining a car; regular oil changes prevent engine failure. A few minutes of upkeep each week will save you hours of scrubbing later on and keep your blinds looking as pristine as the day they were installed.
This proactive approach is what protects your investment, especially for high-quality custom blinds and shades. The goal is to make cleaning less of a chore and more of a simple part of your home care routine.
Crafting a Simple Weekly Routine
Consistency is your best friend. A weekly dusting session, which takes only a few minutes per window, can prevent up to 80% of the dust that would otherwise settle and become a sticky, stubborn mess. Instead of a feather duster that just flicks particles into the air, I always recommend using a microfiber cloth or a dedicated duster wand for better results.
Here’s a simple routine that I've found works wonders:
Close the blinds completely. This gives you a flat, even surface to work with.
Wipe from top to bottom. Start at the highest slat and work your way down in a single motion. This keeps you from pushing dust onto slats you've already cleaned.
Flip and repeat. Rotate the slats 180 degrees using the wand and wipe the other side in the same top-to-bottom pattern.
This whole process for one window often takes less than two minutes. When you do this weekly, you’ll rarely need to perform a heavy, wet cleaning. You can also improve the look of your blinds by keeping your windows clean. If you want to learn more, you might find this comprehensive guide to window cleaning from housekeeping experts helpful.
Troubleshooting Common Mechanical Issues
Beyond just cleaning, regular maintenance involves keeping an eye on the moving parts. Cords can get tangled, and tilting mechanisms can become stiff over time, especially if dust and debris find their way inside.
Once a month, take a moment to operate your blinds fully. Raise and lower them completely, and tilt the slats from fully open to fully closed. This simple action helps keep the mechanisms moving freely and prevents them from seizing up. If you notice a cord starting to fray or a slat that won't align properly, addressing it early can prevent a small annoyance from turning into a costly repair. Minor issues are often simple to fix, but ignoring them can lead to a complete mechanism failure.
Protecting Your Investment Long-Term
Taking care of your window treatments is about more than just looks; it's about preserving their function and value. For premium installations, like those from Home Blinds & Floors, these habits are key to ensuring they last. If you have motorized window treatments, keeping the tracks and mechanisms free of dust is crucial for smooth operation. A quick pass with a vacuum’s brush attachment along the headrail every few weeks can make a huge difference.
By developing these simple habits, you turn blind care from a dreaded project into a manageable practice. Your blinds will not only look better day-to-day, but they will also function flawlessly for years. For more ideas on choosing treatments that fit your lifestyle, check out our guide on must-have blinds for year-round comfort.
Ready to find window treatments that are as beautiful as they are easy to maintain? Contact Home Blinds & Floors today for a free in-home consultation, and let our experts help you choose the perfect solution for your space.


Comments