.avif)
.avif)
.avif)
How to Measure and Install Blinds in Your Delmarva Home
- Johann Reardon

- Jul 22, 2025
- 16 min read
TL;DR: Your Guide to Perfect Window Treatments with Home Blinds & Floors
Free In-Home Consultations: We bring the showroom to you across the Delmarva Peninsula, from Salisbury, MD to Rehoboth Beach, DE.
Custom Blinds, Shades & Shutters: Get the perfect fit and style with products from top brands like Hunter Douglas and Graber.
Family-Owned Expertise: With over 20 years of trusted service, we guarantee a professional experience.
Expert Measurement & Installation: Our team handles every detail to ensure your new window treatments look and function flawlessly.
Skip the DIY Hassle: Let us do the work so you can enjoy beautiful, perfectly fitted blinds without the stress.
Struggling with how to measure and install blinds for a perfect, professional finish? The difference between sleek, custom-fit window treatments and a frustrating DIY headache often comes down to just a few fractions of an inch. At Home Blinds & Floors, we help homeowners across the Eastern Shore avoid common pitfalls and achieve stunning results.
This guide is packed with the practical, hands-on advice we've gathered over years of experience. It’s your roadmap to success, whether you're tackling this yourself or deciding when it's time to bring in a pro for your Delmarva home.
Why Professional Measurement and Installation Matters
Picking out new window treatments is the fun part, but the real magic happens in two key stages: measuring and installing. A tiny mistake here can leave you with blinds that look awkward, catch on the frame, or just don't work right. We’re here to make sure you get it right the first time.
We'll walk you through everything, from the tools you actually need to the specific techniques for different kinds of windows. You’ll understand the crucial differences between an inside and an outside mount, helping you decide what’s best for your home, whether you're in Salisbury, MD, or over in Rehoboth Beach, DE.
Why Precision Is Everything
Think of accurate measurements as the blueprint for your entire project. When you get them spot-on, you guarantee your new blinds, shades, or shutters will:
Operate smoothly without snagging or scraping against the window frame.
Deliver total light control and privacy by getting rid of those annoying light gaps.
Look clean and polished, elevating your room's overall style.
Fit perfectly, avoiding that generic, "off-the-shelf" feel.
Getting the measurements right from the start saves you time, money, and the frustration of a project gone wrong. It's the difference between a quick DIY win and a costly mistake.
As a local, family-run business, Home Blinds & Floors provides personal service, competitive pricing, and professional installation throughout Sussex, Wicomico, Kent, and beyond. We've worked on countless homes throughout Delmarva and know the unique architectural styles inside and out, which means we ensure a perfect fit every single time.
This guide will give you the confidence to get started. We're sharing the same tips and tricks our own team uses in the field. Let’s get to it and start transforming your windows.
Getting Set Up: Tools for a Perfect Fit
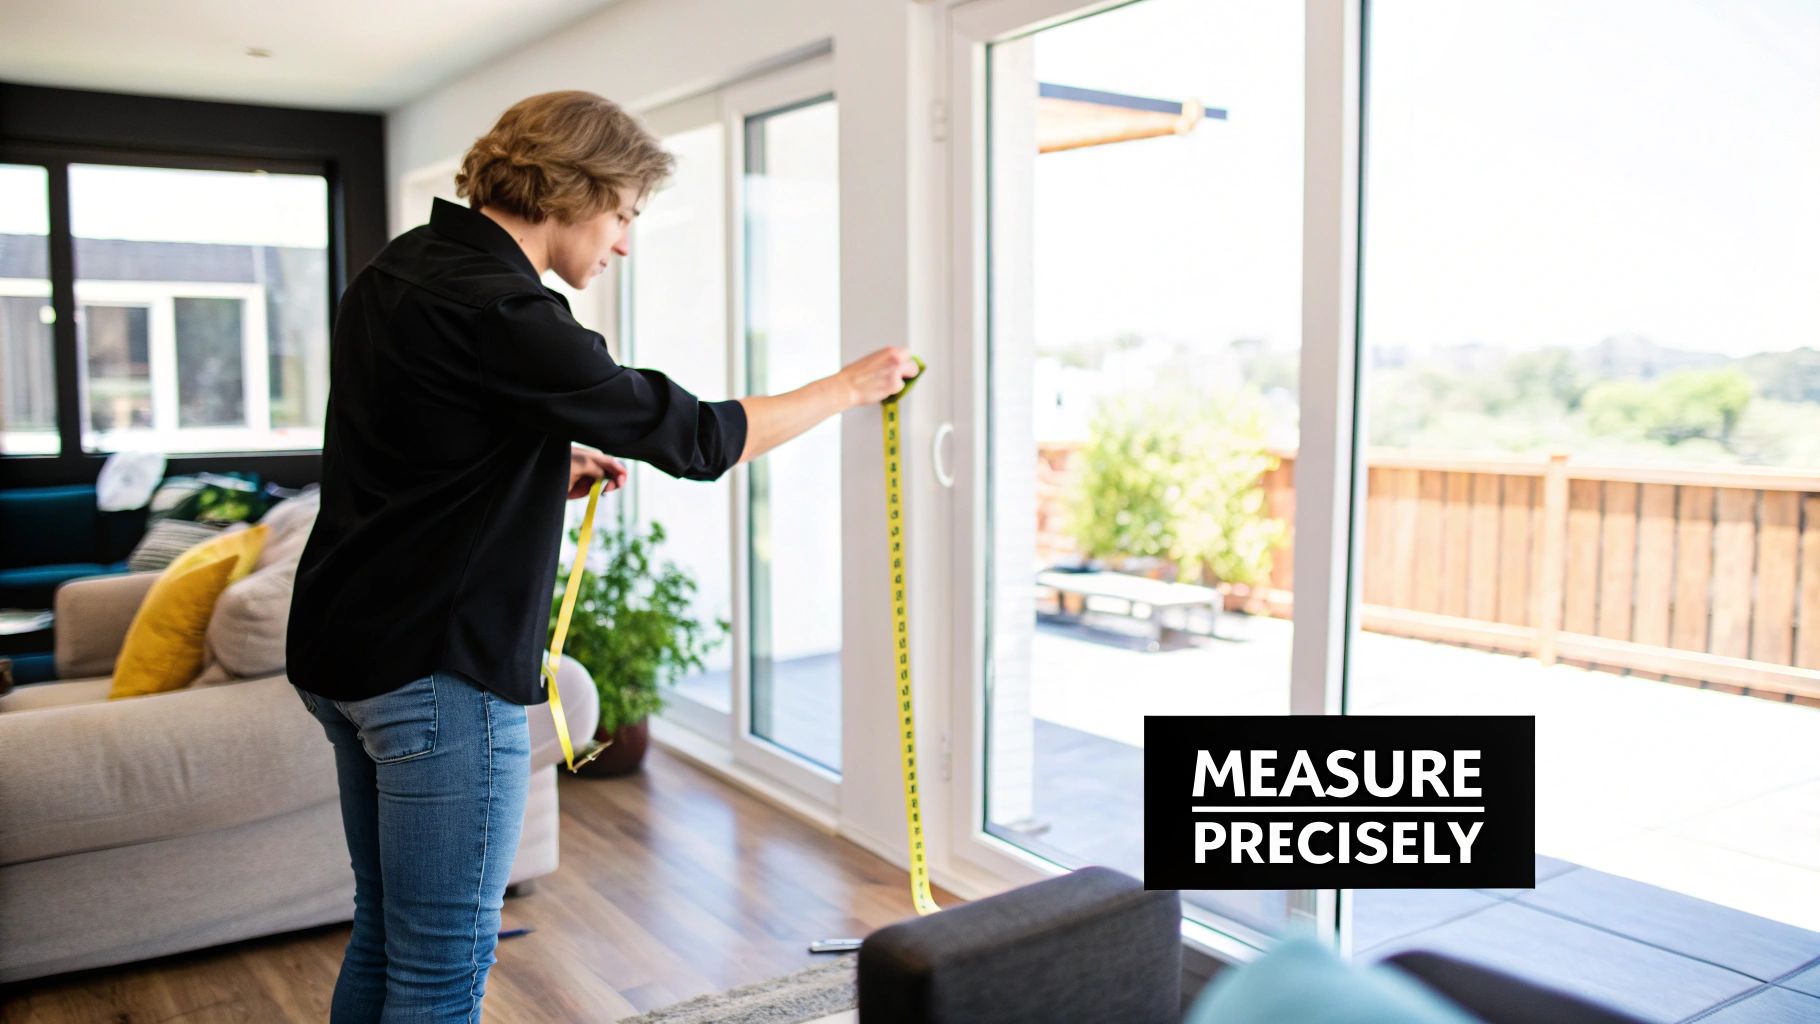
Before you even think about ordering those new blinds, let's talk about getting a precise measurement. This is the one step where a small mistake can lead to a big headache, turning an exciting home upgrade into a frustrating mess. To avoid that, you need to start with the right gear.
This isn't just about grabbing whatever tape measure is lying in your junk drawer. It's about using specific tools that guarantee accuracy. After all, the perfect fit for your new Hunter Douglas shades or Graber shutters depends entirely on the numbers you record. Getting this right from the start is what makes the difference.
Of course, if you're working with Home Blinds & Floors, we handle all of this for you during our free in-home consultations. We bring our expertise and professional tools right to your Salisbury or Rehoboth Beach home, taking the guesswork out of the equation.
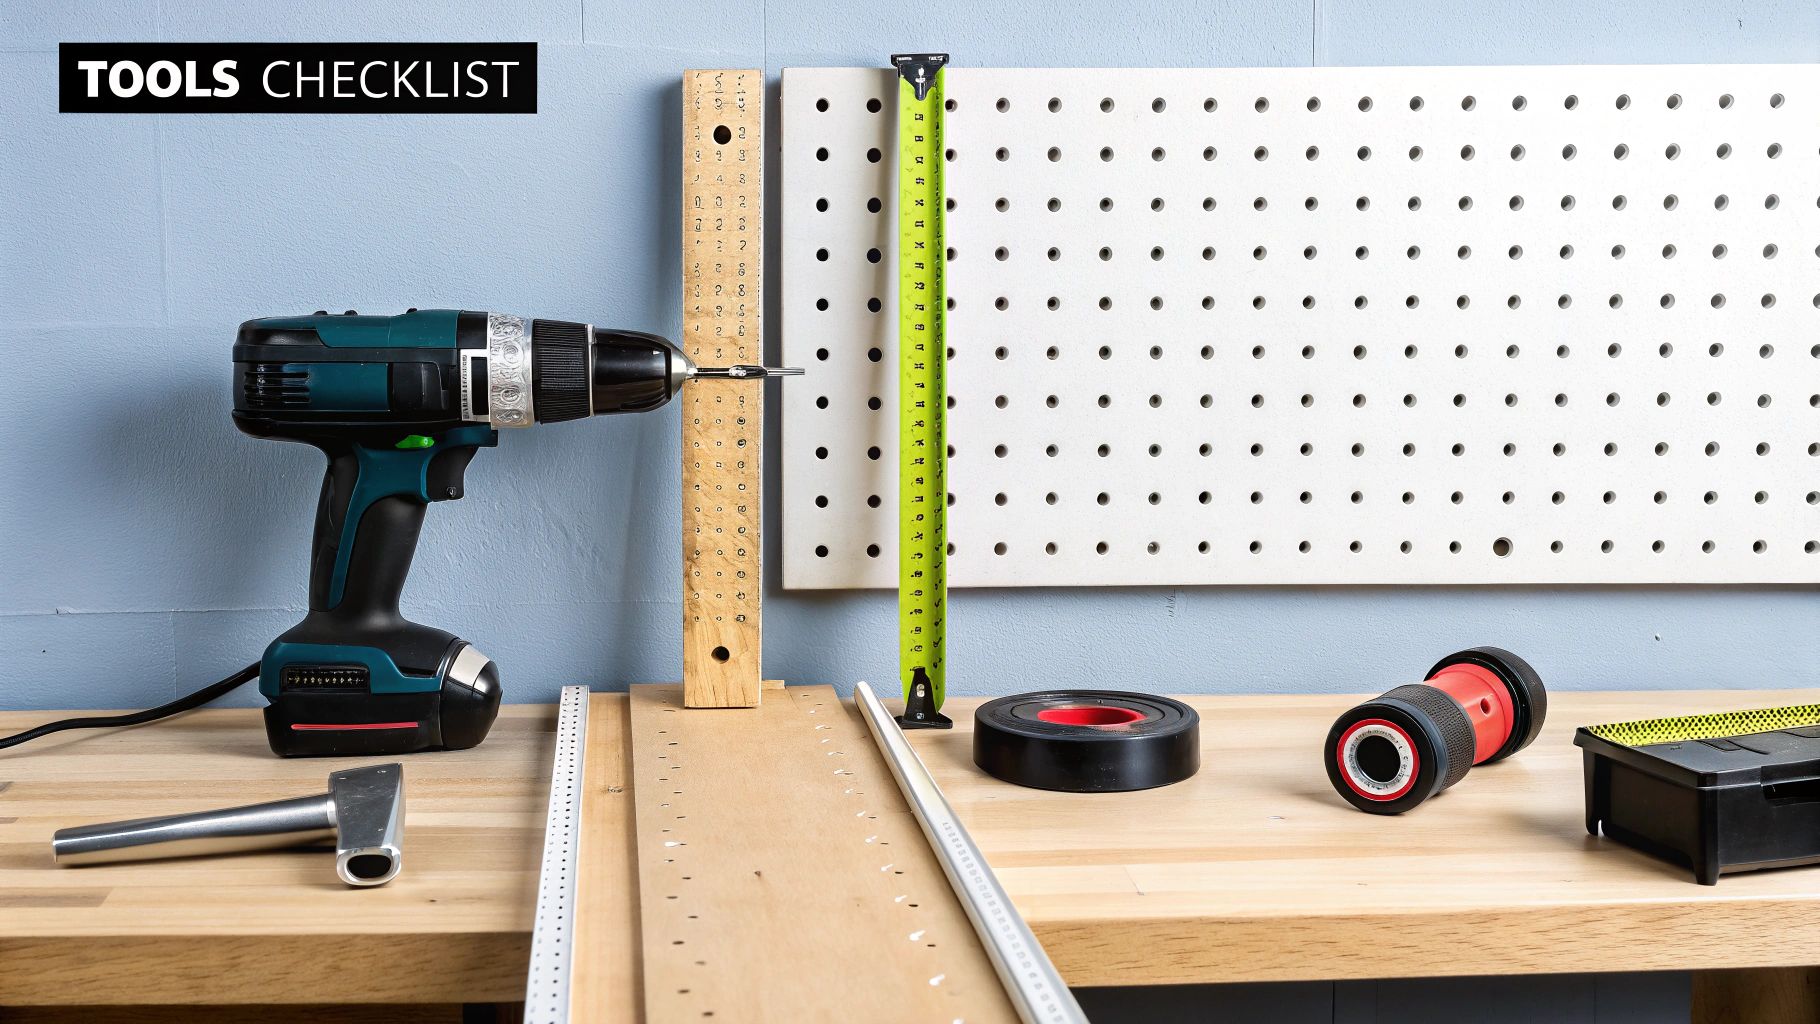
Your Essential Toolkit for Measuring Window Blinds
To get started, you'll want to gather a few essential items. Having this toolkit ready will make the entire process smoother and, more importantly, far more accurate.
Tool | Why It's Essential | Pro Tip |
|---|---|---|
Steel Tape Measure | This is your most important tool. Unlike a cloth or vinyl tape, a steel one won't sag or stretch, giving you a true, accurate reading every single time. | Make sure the tip is secure and not bent. A damaged tip can throw off your measurement by as much as 1/8 inch. |
Sturdy Step Ladder | Safety first! A secure ladder is a must for reaching the top of your windows safely and getting a straight, eye-level measurement. | Don't try to stretch or lean. Reposition the ladder so you can read the tape measure directly without guessing. |
Pencil and Notepad | Don't trust your memory, especially if you're measuring multiple windows. Write down every measurement immediately. | Label everything clearly: "Kitchen Window - Top Width," "Living Room Left - Height." This prevents mix-ups later on. |
Having these three simple tools on hand is the professional way to begin any window treatment project. It sets the foundation for a flawless installation.
Understanding the Key Measurements
Once you have your tools, you need to know what to measure. It's not as simple as just one width and one height. Window frames are rarely perfect squares, so a little extra diligence here pays off.
You'll be focusing on three main dimensions:
Width: This is the distance from one side of the window frame to the other. You’ll need to measure this at the top, middle, and bottom of the window opening.
Height: This is the vertical measurement from the top of the frame down to the windowsill. Just like with the width, you'll want to measure this on the left side, in the center, and on the right side.
Depth: This one is crucial if you're planning for an inside mount. It's the space from the front edge of your window frame back to the glass (or any obstruction, like a crank handle). This measurement tells you if the blind's headrail will fit cleanly inside the frame without sticking out.
A common mistake I see is people only measuring once. Houses settle, and frames can be surprisingly uneven. Always take three measurements for both width and height—it's the industry standard for a reason.
For a more detailed walkthrough, our guide on [how to measure windows for blinds for a perfect fit](https://www.homeblindsandfloors.com/post/how-to-measure-windows-for-blinds-for-a-perfect-fit) has visuals and extra tips to help you nail it. Mastering this is what separates a DIY-looking job from a truly professional installation.
From free in-home consultations to flawless installation, Home Blinds & Floors takes the stress out of selecting window treatments. Our team ensures every measurement is perfect for your custom blinds, shades, or shutters.
Choosing Your Fit: Inside vs. Outside Mount
This is where the rubber meets the road. The way your new blinds sit—either neatly inside the window frame or overlapping it on the outside—completely defines the finished look. Getting this choice right, and taking the right measurements for it, is the secret to a professional-grade installation.
For anyone living on Delmarva, from the classic Colonials in Easton to the modern coastal homes in Bethany Beach, understanding these two methods is your first step. Each one offers a different style and its own set of practical benefits.
The Clean Look of an Inside Mount
An inside mount is exactly what it sounds like: the blind fits perfectly inside the window casing. It’s a fantastic choice for a clean, built-in look that really shows off your window trim and any architectural details. If you're going for a minimalist vibe, this is usually the way to go.
The catch? There is zero room for error with an inside mount. Your measurements have to be dead-on. Plus, your window frame needs to have enough depth to hold the blind's headrail without it jutting out into your room.
Here’s how to get it right:
Measure Width in Three Spots: Grab your steel tape measure and check the width at the very top, in the middle, and at the bottom of the inside of the window frame. Trust me, most window frames aren't perfectly square. You'll likely get three slightly different numbers. Always use the narrowest measurement. This guarantees your blind won't scrape or get stuck.
Measure Height in Three Spots: Do the same thing for the height. Measure on the left, in the center, and on the right. Just like with the width, record the shortest of the three measurements. This is crucial to prevent the bottom of the blind from bunching up on your windowsill.
Don't Forget the Depth: This is the one people always forget. Measure from the front edge of the frame all the way back to the glass (or any obstacle, like a crank handle). This depth measurement is what tells you if the headrail of your new faux wood blinds or roller shades will actually fit.
I can't tell you how many times I've seen a project go sideways because the depth was ignored. You can have the width and height perfect, but if that headrail sticks out, the whole clean look is ruined. It’s a small detail that makes a huge difference.
The Versatile Fix of an Outside Mount
So, what if your window frame is too shallow, or really crooked? That's where an outside mount comes in. With this method, the blind is installed on the wall or trim above and around the window.
This approach is a fantastic problem-solver. It’s the go-to for windows lacking depth, but it’s also great when you want to block out as much light as possible or maximize privacy. An outside mount can even trick the eye, making a small window seem larger and more dramatic.
When you measure for an outside mount, you’re aiming for good overlap.
For the Width: Measure the full width of your window, including the trim if you plan to cover it. Then, add at least 1.5 to 3 inches to each side. This extra coverage is what kills those annoying light gaps. So, if your window opening is 35 inches wide, you'll want to order a blind that's between 38 and 41 inches wide.
For the Height: Decide how high above the frame you want the headrail to be. A good rule of thumb is 2 to 3 inches higher than the top of the trim. Measure from that point down to where you want the blinds to end, which is typically just below the windowsill. This extra height blocks more light and just looks more polished.
This visual guide breaks down the core idea of measuring width and height for both mount types.
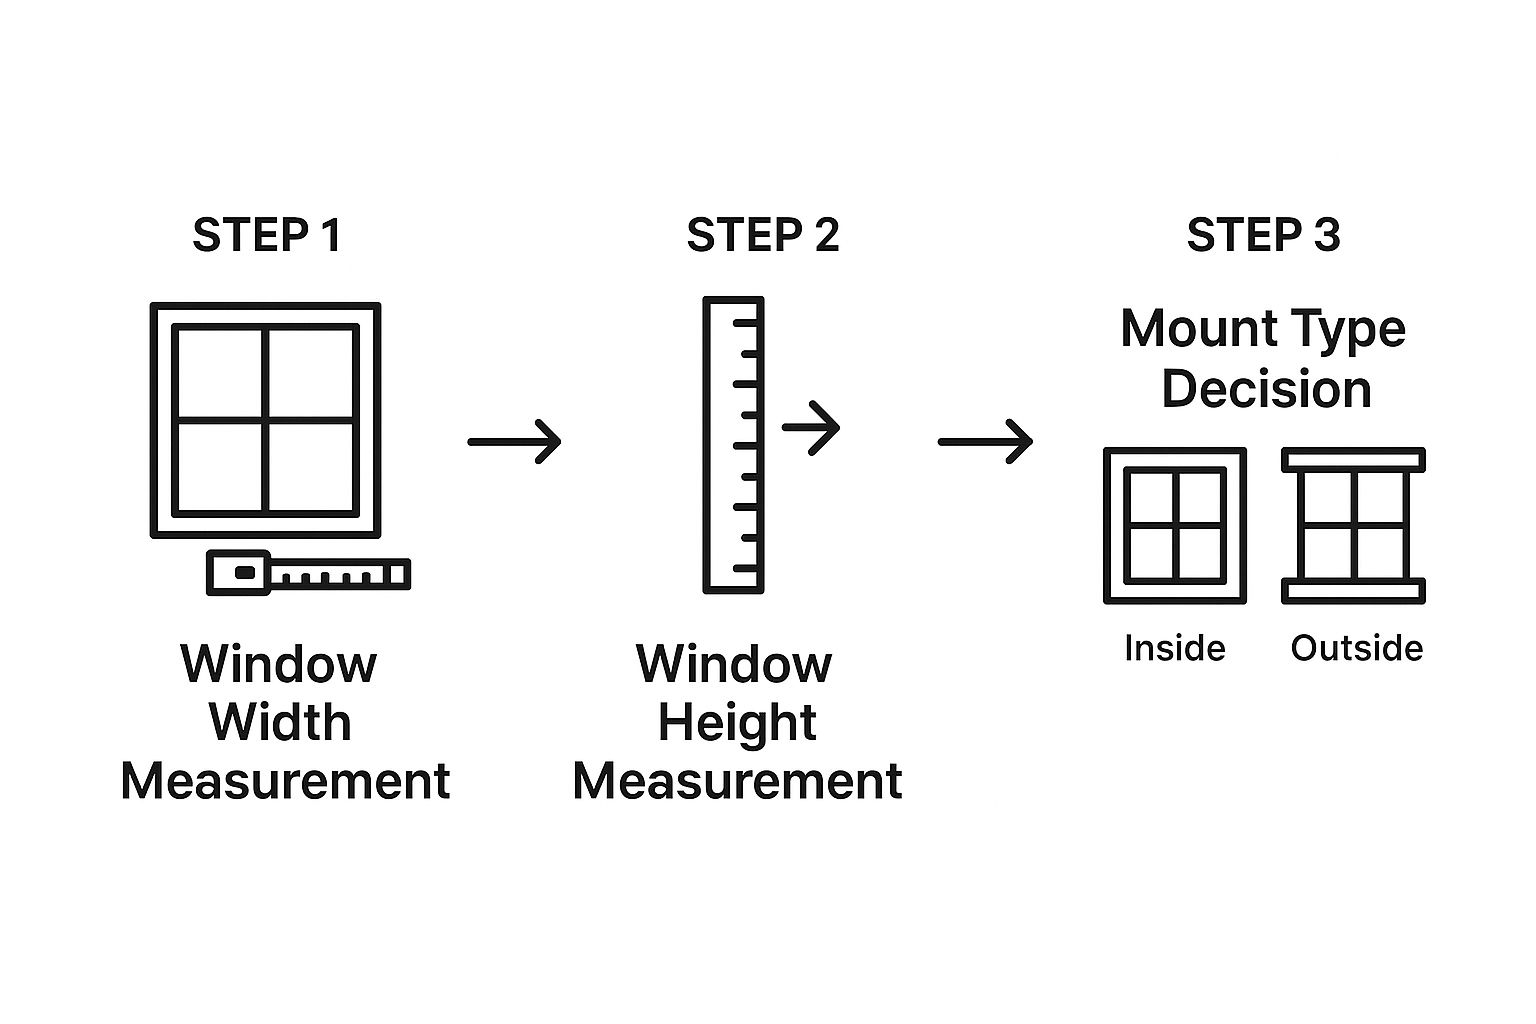
As you can see, it all starts with those basic width and height numbers before you decide if a sleek inside mount or a full-coverage outside mount is right for your home.
Ultimately, the choice comes down to your specific windows, what you need them to do, and your personal style. For an even more detailed walkthrough, feel free to check out [our expert installation guide](https://www.homeblindsandfloors.com/post/how-to-measure-for-blinds-your-expert-installation-guide) for more pro tips.
Home Blinds & Floors offers a wide selection of custom blinds and shades in Delmarva, with expert installers who bring the showroom to your living room. Whether it's plantation shutters in Easton or cellular shades in Ocean City, we ensure your measurements are always spot-on for a perfect fit.
A Step-by-Step Guide to Installing Blinds
You’ve done the hard work of measuring, and your new blinds have finally arrived. Now for the satisfying part: the installation. This is where your vision turns into reality. While it might look a little intimidating at first, putting up most blinds—like standard horizontals or roller shades—is a surprisingly straightforward project when you know what you’re doing.
This guide will walk you through the entire process, from opening the box to that final, satisfying click when everything is in place. We’ll focus on the core techniques that apply to most common blind types, giving you the confidence to get a professional-looking result.
Of course, if you'd rather leave it to the pros, Home Blinds & Floors has you covered. From our free in-home consultations to a flawless installation, our team handles every detail, guaranteeing a perfect fit for your Delmarva home.
First Things First: Unpack and Prep
Before you even think about grabbing a drill, carefully unbox your new blinds. I always recommend laying everything out on a soft surface like a blanket or an old rug to avoid any accidental scuffs or scratches.
Next, do a quick inventory. Compare what’s in the box to the parts list that came with your instructions. You should find:
The blind itself (the headrail and the slats or fabric).
Your installation brackets.
Screws and any other necessary fasteners.
The valance and its clips, if your model includes one.
Any extra hardware, like hold-down brackets or a cord cleat.
One last check: make sure the measurements on the box match the window you're about to work on. It sounds simple, but this quick confirmation can save you from a major headache down the line.
Nailing the Bracket Placement
Your brackets are the unsung heroes of the installation. Getting their placement perfect is absolutely crucial for a secure, level blind that operates smoothly.
Start by figuring out exactly where the brackets need to go. For an inside mount, you'll be attaching them to the top of the window frame (the "ceiling" of the casement) or to the sides. For an outside mount, they'll go on the wall or trim above the window opening.
Hold a bracket in position, about two inches in from where each end of the headrail will sit. Use a sharp pencil to mark the screw holes. If your blind came with a center support bracket, position it right in the middle of the window's width and mark its holes, too. For an outside mount, using a level at this stage isn't optional—it's essential for getting a perfectly straight finish.
Now, drill pilot holes on your marks. This small step makes driving the screws much easier and, more importantly, prevents the wood from splitting. If you're drilling into drywall where there's no stud behind it, you must use wall anchors. The weight of the blind will pull the screws right out of plain drywall otherwise.
With your pilot holes ready, go ahead and screw the brackets securely into place.
My Go-To Tip: Don't crank the screws down as tight as they can go just yet. Leave them just a tiny bit loose. This gives you a little wiggle room for minor adjustments after the blind is up. Once you confirm it's level, then you can give them that final tightening.
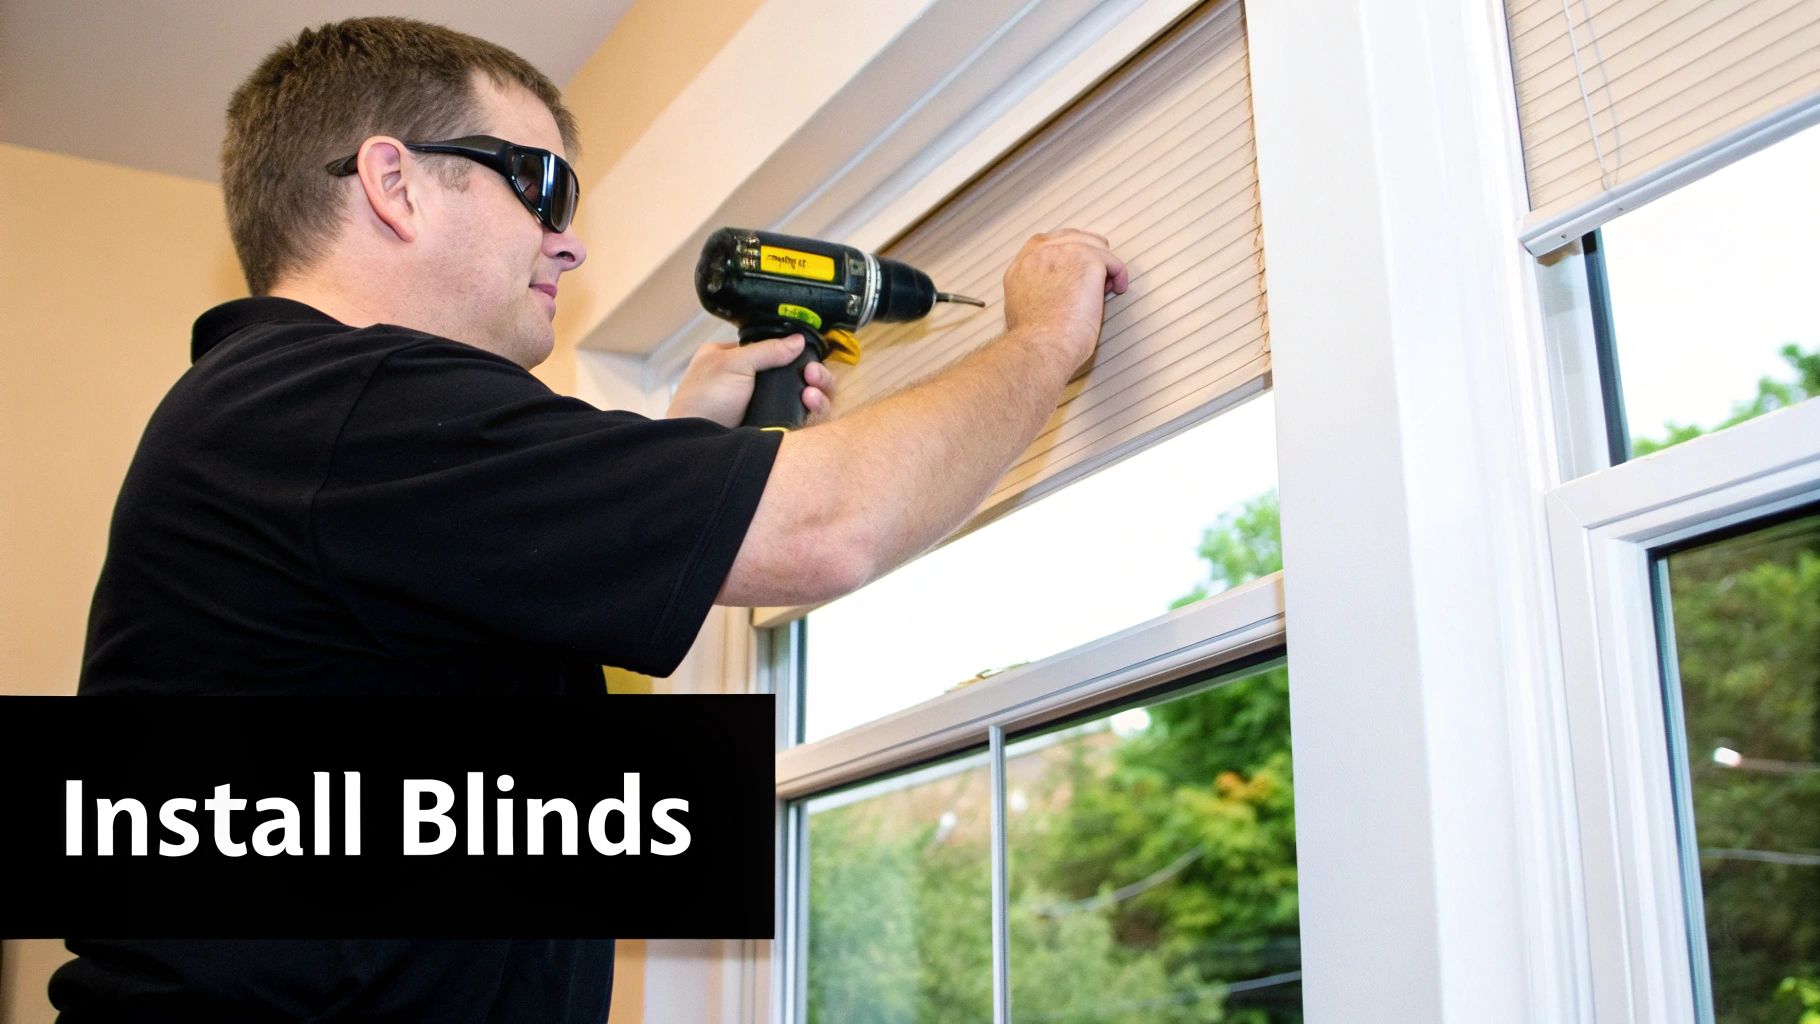
Hanging the Blind and Finishing Up
With the brackets firmly in place, you’re on the home stretch. The final steps vary slightly depending on the type of blind you have.
For Horizontal Blinds (Wood, Faux Wood, Aluminum): Most of these have a headrail that simply snaps into the brackets. You’ll want to hook the front of the headrail into the front lip of the brackets, then rotate the back edge up firmly until you hear and feel it click into place.
For Roller & Cellular Shades: These often use a groove or spring-loaded system. You’ll typically slide one end of the headrail into its bracket and then compress the other end to pop it into the opposite bracket until it locks.
Always give the headrail a gentle tug to make sure it’s securely locked in. The last step is attaching the decorative valance. Just snap the included clips onto the headrail and then slide the valance onto the clips. If you have corded blinds, don't forget to install the cord cleat on the wall or window frame to keep the cords tidy and safely away from children and pets.
Doing this installation properly is more important than ever. The global window blinds market, valued at around USD 3.8 billion, is expected to climb to USD 6.15 billion by 2033. This growth is fueled by homeowners wanting more attractive and energy-efficient solutions. A well-installed blind delivers the maximum insulation and light control it was designed for, making your investment worthwhile.
For those who enjoy tackling home projects, checking out other DIY tips for installing building hardware can build your skills even further. While these steps work for most blinds, keep in mind that specialty products often have their own unique installation needs. For instance, you can see just how different the process is in our detailed guide on [how to install plantation blinds](https://www.homeblindsandfloors.com/post/how-to-install-plantation-blinds-complete-diy-guide).
As a local, family-owned business, Home Blinds & Floors prides itself on personal service, fair pricing, and expert installation across Sussex, Wicomico, Kent, and the surrounding areas. We're here to ensure your project is a success from start to finish.
How to Troubleshoot Common Installation Issues
Even with the best planning and a perfectly measured window, sometimes a DIY installation hits a snag. It happens to everyone. You might discover a window frame isn't quite square, or you hit something unexpected behind the drywall. Don't let it throw you off track. Most of these hiccups are pretty common and, thankfully, have simple fixes.
Think of this as your go-to guide for those "uh-oh" moments. We’ll walk through the most frequent issues homeowners run into and give you clear, actionable ways to solve them without the headache.
At Home Blinds & Floors, we’ve seen it all across Wicomico, Sussex, and Kent counties. From free in-home consultations to making sure the final installation is flawless, our team knows exactly how to handle any challenge that pops up.
Handling Uneven or Out-of-Square Windows
This is probably the most classic issue, especially in older Delmarva homes. You hang the blind, take a step back to admire your work, and notice it’s hanging just a little bit crooked. It’s almost always because the window frame itself isn’t perfectly level or square.
The fix is surprisingly simple: shims. These are just small, thin wedges—you can use plastic ones or even a piece of sturdy cardboard in a pinch. If one side of the blind hangs lower than the other, just tuck a shim behind the mounting bracket on that lower side. This will lift it just enough to level things out. Keep adding shims one by one until it looks perfectly straight.
Adjusting Blinds That Feel Too Tight or Loose
What do you do if your inside-mount blind feels way too snug when you try to pop it into the frame? The last thing you want to do is force it, which could damage both the blind and your window casing.
If it's just a tiny bit too wide, a professional might be able to trim a small amount off the end. But if it’s too loose and you’re seeing big light gaps on the sides, an outside mount might be the better solution. This is why we always say measure, measure, and measure again!
As a local, family-run business, Home Blinds & Floors prides itself on personal service and getting those measurements perfect from the start, so you don't have to worry about these problems.
Dealing with Unexpected Obstructions
You’re drilling a pilot hole for a bracket and suddenly hit something solid. Stop drilling immediately. You could have run into a metal stud plate, a pipe, or even an electrical wire.
Here’s what you might be dealing with:
Metal Studs: If you hit metal, you’ll need to switch to self-tapping screws. These are designed to drill their own way through light-gauge metal, unlike standard wood screws.
Alarm Sensors: Many modern windows have alarm sensors built right into the frame. You absolutely have to work around these. You might need to shift your bracket location slightly or use bracket spacers to create extra clearance.
Expert Tip: The number one rule when you hit an unknown obstruction is to stop and figure out what it is. Forcing a screw can lead to very expensive repairs. It's always better to move your bracket an inch than to risk hitting something critical.
Even the most straightforward DIY blind installation can present a few puzzles. I've put together a quick problem-solving table to help you identify what's going wrong and how to fix it on the fly.
DIY Installation Problem Solver
Common Problem | Likely Cause | How to Fix It |
|---|---|---|
Blind hangs crooked. | The window frame is not level or square. | Use shims behind the mounting bracket on the lower side to raise it until level. |
Inside mount is too tight. | Measurement was slightly off, or the window isn't uniform. | Do not force it. A professional may be able to trim the headrail. Re-measure to confirm. |
Drill won't go in. | You've hit metal, concrete, or another obstruction. | Stop drilling. Use a self-tapping screw for metal or a masonry bit for concrete. |
Brackets don't feel secure. | Drywall alone is too weak; you missed the wood stud. | Use drywall anchors rated for the blind's weight. Locate the stud for a more secure fit. |
Blind won't raise/lower evenly. | The cords inside the headrail may be tangled or off the drum. | Gently lower the blind completely, then tug on the lift cords to reset them on the mechanism. |
This table covers the most common snags, but remember that patience is your best tool.
The demand for great-looking, functional window treatments is on the rise, with the global blinds and shades market valued at nearly USD 11 billion. This isn't just about looks; it's about getting solutions that boost energy efficiency and comfort, which makes getting the installation right even more important.
Now that your blinds are perfectly installed, the next step is keeping them in pristine condition. For some easy maintenance tips, check out our simple guide on how to clean blinds.
Frequently Asked Questions About Measuring and Installing Blinds
Over the years, we've helped countless homeowners across Delmarva get their window treatments just right. Along the way, we've heard just about every question in the book. Here are the answers to a few that come up time and time again.
What's the biggest mistake people make when measuring for blinds?
The most common mistake is also the easiest to avoid: only measuring the width and height once. Window frames, especially in the beautiful older homes across the Delmarva Peninsula, are almost never perfectly square. You must measure the width at the top, middle, and bottom, and do the same for the height (left, center, and right). For an inside mount, you always use the narrowest width and shortest height to ensure a perfect, non-scraping fit.
How much should blinds overlap for an outside mount?
For an outside mount, a good rule of thumb is to add at least 1.5 to 3 inches of overlap on each side of the window frame. This extra coverage is key to maximizing light control and privacy. A wider overlap can also be a great designer trick to make a small window look much larger and more impressive.
What are the best blinds for privacy in a home?
For ultimate privacy, blackout roller shades, plantation shutters, and top-down/bottom-up cellular shades are excellent choices. Blackout shades block nearly all light, while shutters offer a solid barrier. Top-down/bottom-up shades are incredibly versatile, allowing you to let light in from the top while keeping the bottom half of the window covered for privacy.
Do you offer motorized blinds that work with smart home systems?
Yes! We specialize in motorized window treatments from leading brands like Hunter Douglas and Graber. Many of these systems, including PowerView® Automation, can be integrated with popular smart home platforms like Amazon Alexa, Google Assistant, and Apple HomeKit, allowing you to control your blinds with your voice or an app.
What cities in Delmarva do you serve?
Home Blinds & Floors is proud to serve communities all across the Delmarva Peninsula. Our service areas include Salisbury, Ocean City, Easton, and Cambridge in Maryland. We also cover Rehoboth Beach, Lewes, Bethany Beach, and all of Sussex and Kent counties in Delaware. Just give us a call to schedule your free in-home consultation.
Still weighing your options? You might find some great insights in our guide on [how to choose window treatments for every room](https://www.homeblindsandfloors.com/post/how-to-choose-window-treatments-expert-tips-for-every-room).
Your Local Delmarva Experts for Blinds, Shades, and Shutters
In summary, Home Blinds & Floors provides custom window treatments, expert advice, and professional in-home service to homes and businesses across the Delmarva Peninsula. From Rehoboth Beach to Easton, our team is here to help you choose the best shades, shutters, or blinds for your space, ensuring a perfect fit and flawless installation every time. Schedule your free consultation today and let us bring the showroom to you.
Comments